We already had insight on What is EC2 instance and How to launch EC2 in chapter one and chapter two respectively. So, in this post, we will learn “How to ssh to EC2 instance”. I will showcase all possible ways to connect or ssh to your EC2 instance in AWS.
How to ssh to EC2 instance
There are basically three ways to ssh to EC2 instance –
- EC2 instance connect
- Session manager
- SSH client
Method #1 – Login EC2 using instance connect
This is one of the easiest and quickest methods to connect your EC2 instance. In this method, You even don’t need a key-pair file. EC2 instance connect is basically a browser-based connection method.
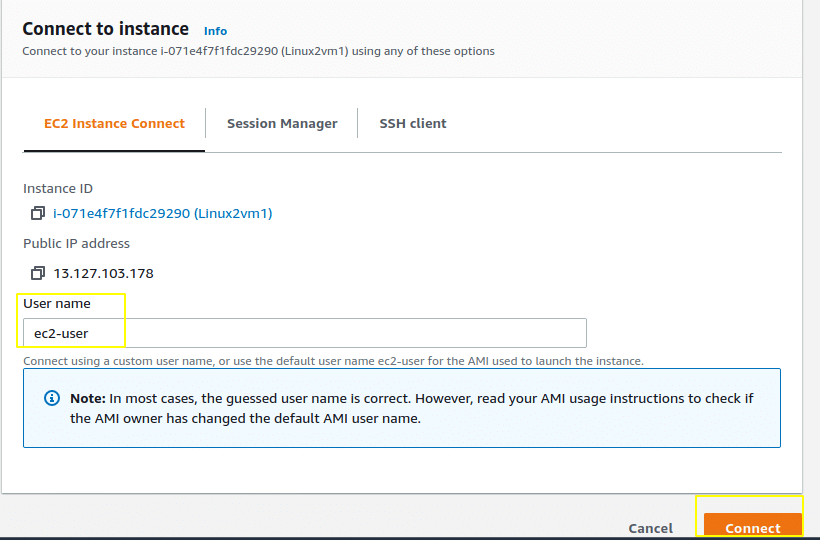
In most of the cases, guessed username will be fine until username has been changed in AMI.
For browser based EC2 instance login, follow these simple steps-
- Login to your AWS portal
- visit EC2 instance dashboard and select instances from the left pane
- Right-click on EC2 instance and select connect
- Provide your username to login and click connect
Step #1 Login to your AWS portal
Open browser and login to AWS portal with your credentials. After that type “EC2″ in Find services to reach EC2 instance dashboard.

Step #2 visit EC2 instance dashboard and select instances
Once you will reach EC2 instance dashboard, Select “instances” from left pane. Afterwards, select instance you want to connect. For example, Linux2vm1 as shown.

Step #3 Right-click on EC2 instance and select connect
Here you have two options, either you can “right click” and select connect or click “Actions” and then select connect. In both ways, you can connect to EC2 instance.

Step #4 Provide a username to login and click connect to EC2 instance
Method #2 – SSH EC2 instance using Session manager
The session manager is a configuration that is assigned to your manage instances. For example, you may need to update antivirus or need to patch on regular intervals. So you can just apply an association to maintain that schedule of patching or antivirus update automatically.
Free tier in AWS supports many associations, few of them are –
- Managing instances
- Patch compliance scanning of EC2 instance
- Inventory collection
- SSM agent configuration
- Enable explorer.
To connect instance using session manager, SSM agent configuration association need to apply.
Use these steps to apply association Id –
- Install or upgrade SSM agent on your EC2 instance
- Apply SSM agent configuration to your instance
- Connect your EC2 instance
1.) Install or upgrade SSM agent to SSH your EC2 instance –
Whenever you click on the Session manager tab, you will face this error, “we weren’t able to connect to your instance“. Because either SSM (system manager agent) is not installed/started. Also, in case the agent is running, then you need to associate the SSM agent configuration with your instance.

To get this ssm agent issue resolved, Connect to your EC2 instance using method1. Then, check ssm agent status.
-> Run “systemctl status” command to check status.
sudo systemctl status amazon-ssm-agent
if status shows stopped, then start it using systemctl command.
sudo systemctl start amazon-ssm-agent
If somehow, amazon-ssm-agent is not installed. Then you need to install ssm-agent.rpm in your EC2 instance.
So, in my case i am using Amazon linux2 X86-64 bit version.
Run "yum" command to install amazon-ssm-agent.

sudo yum install -y https://s3.amazonaws.com/ec2-downloads-windows/SSMAgent/latest/linux_amd64/amazon-ssm-agent.rpm

Sometimes, you may encounter below mentioned error while installing ssm agent. Then, change the URL from region to Global as shown in last command.
Cannot open: https://s3.region.amazonaws.com/amazon-ssm-region/latest/linux_amd64/amazon-ssm-agent.rpm. Skipping.
Error: Nothing to do
In my case, agent was installed already on my EC2 instance, still i have updated it to latest version.

Once you are done with installation, then check status of ssm-agent again. For example, Status is active (running) in my case.
sudo systemctl status amazon-ssm-agent

2.) Attach SSM agent configuration to your EC2 instance
To attach or associate a profile, you need to visit AWS manager quick setup dashboard. Then, provide configuration options as per your requirement. If you are new to AWS, then I will suggest you, keep all options default.
Once you are done with configuration then Click enable.

After you have enabled and setup ssm-agent configuration parameters on your managed EC2 instances.

Now you need to apply association. So, visit the Quick setup dashboard, scroll down to “SSM agent configuration” and click “View details“. Check for association status in the description tab. if it’s not (success).
Click on “Apply association now” button and then click Apply.

Once the association is successful. Then you can visit your EC2 instance and click connect.
Select the session manager tab and now, you will see there is no error, and connect button is available.
Good thing is, it will be applicable for all of your online managed instances. you don’t need to associate ssm agent profile again and again.
Click connect and voila! you will be inside Amazon EC2 instance.


Alternatively, you can also connect your EC2 instance using AWS system manager -> session manager -> start a session setup.

Session manager usage –
- Connect to EC2 instance without ssh or bastion host
- AWS key management service takes cares of your EC2 instance security
- Flexibility to redirect commands or logs to cloud watch or Amazon S3 bucket
Method #3 – Remote SSH to EC2 instance
If you want to connect your EC2 instance remotely using SSH. Then look for these prerequisites –
1 – Host Key-pair file
2 – Putty, Power-Shell or Linux terminal access
3 – Public IP or DNS name of your EC2 instance
4 – Port 22 or port 3389 must be open in security group, in case of Linux or Windows instance respectively.
SSH to EC2 instance using Ubuntu Linux Terminal
In my case, I have an EC2 Linux 2 VM in AWS and Ubuntu 18.04 Linux in my system to ssh EC2 instance.
Step -1
Open Terminal in Ubuntu Linux and Change to directory where you have downloaded EC2 instance key pair. In my case, my key-pair is in “download” directory.
Step – 2
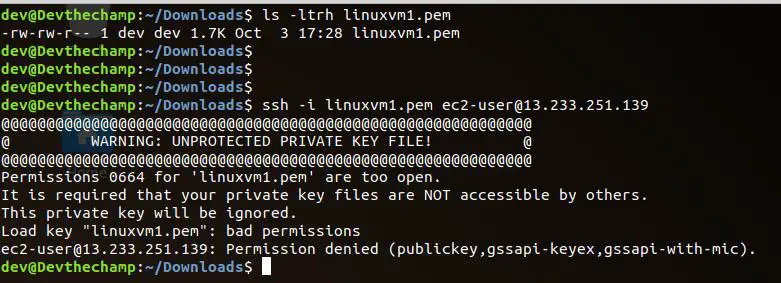
Change permissions of key-pair to 0400 by using chown command.
sudo chmod 0400 "Key-pair-file"

For example, I tried ssh to EC2 instance without changing permissions and encountered “unprotected private key file” error.
Step – 3
SSH to your EC2 instance with your public IP or DNS name.
ssh -i linuxvm1.pem user@public-ip-ec2-instance

SSH to EC2 instance using Windows
If you have Windows as operating system, then you can connect your EC2 instance using either putty or PowerShell. Let me show you both options one by one :-
SSH to EC2 instance using Putty
Step1
Download putty from putty.org and install it on your system.

Step2
Go to “C:\Program Files\PuTTY” and run puttygen.exe
Step3
Now click on “Load” to load your private key. Which is host key-pair of your EC2 instance. Make sure, you select “All files” while browsing for your key file. Basically, we need to convert “.pem” file to “.ppk” format, which putty understands.

Once import is successful, click OK and then “save private key“. In this example, i am generating private key with blank passphrase.

Now open putty and click SSH —> Auth in left panel and then browse your private key, which you saved earlier. For instance, i have selected my “linuxvm1-private.ppk” file.

Now go to session –> Enter public ip address or DNS name of your EC2 instance –> click open.

Provide a username and then the password. In this example, the username is ec2-user and password is “blank”. Because I have not set up any passphrase during the private key import. So, no password is required. Finally, we have connected our EC2 instance using putty.

SSH to EC2 instance using PowerShell
If you have Windows 10 or greater, PowerShell can help you to connect your EC2 instance easily.
Step 1
Change host key file permissions. For that, you need remove access of all other users and you need to keep it for yourself only on file.
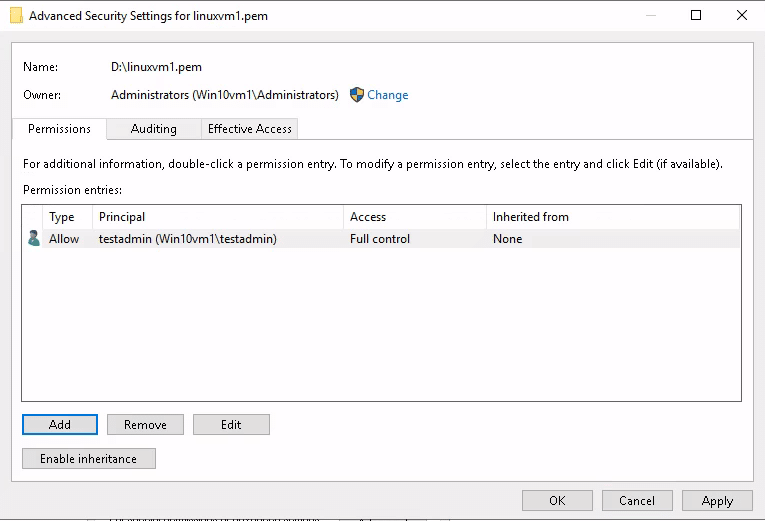
Right Click on host-key-file –> security tab –> advance –> disable inheritance –> Remove Inheritance –> Apply.
Now add your user and provide “full control” to this key pair file. In my case, the user is “testadmin“. If you will miss this step, you may encounter, “unprotected private key file” error. Then you won’t be able to connect your EC2 instance.
click Apply and then OK.
Step 2
Open Windows PowerShell using “Run as administrator permissions”. Then use ssh command with -i option, to connect your EC2 instance.
ssh -i ".pem-file" ec2-user@public-ip-address-of-ec2-instance

Video tutorial
Video tutorial for all possible ways on “How to ssh your EC2 instance”.
Conclusion
Now you know all the ways, on How to ssh to E2 instance”. Connecting EC2 instance is easy, you just need to check around permissions of host key file.
I hope this tutorial was helpful to you. If yes, then leave your comments and share this post on your social media page.
See you soon in next post, till that time take a good care of yourself.