
In this tutorial, you will learn to install Anaconda in Ubuntu with the latest Anaconda3 package. This can be really helpful if you are new to the Anaconda world and want to learn it. I have also covered details on how to update, uninstall and run your first code in Python and Spyder.
What is Anaconda
Anaconda {a.ka. Anaconda Python} is a Python and R programming language distribution for scientific computing. All predictive analytics, data science, machine learning and big data falls under scientific computing.
It’s helps to simply package management and deployment. Anaconda is available for all platforms like Windows, macOS and Linux.
There are two version available to install Anaconda in Ubuntu
- Anaconda distribution or Individual edition, which are open source and free
- Anaconda Team Edition and Anaconda Enterprise Edition are paid
In this tutorial, I will cover the Anaconda individual edition. It comes with more than 250 packages automatically installed and over 7500 packages available in the PyPI repository.
Conda is an open-source, language-agnostic and cross-platform package manager. It helps to manage and deploy packages using the command line while Anaconda navigator is a GUI alternative.
Download Anaconda for Ubuntu Linux
There are two methods to download Anaconda in Ubuntu –
- Manually by visiting anaconda.com using Browser
- Anaconda download in Ubuntu terminal using Curl command
Step 1.1 (Method1) – Download Anaconda manually using Browser
Visit Anaconda.com > Scroll down and go to Anaconda installer section > Download anaconda installer of Linux with Python 3.8. The latest version of anaconda is Anaconda3-2020.11 while writing this tutorial.
Once download is complete, move this script to your Ubuntu machine using WinSCP or SCP utility.
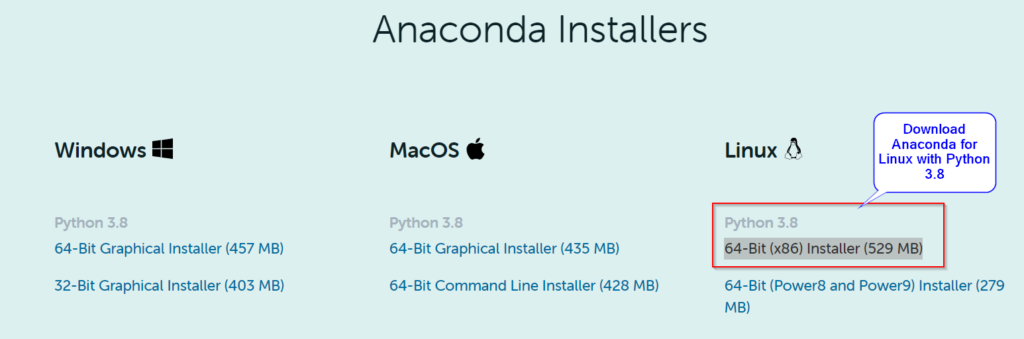
Alternatively, Click on Download button to avoid all hassles.
Step 1.2 (Method2) – Download Anaconda using curl command in Ubuntu
- Press <Ctrl + Alt + t> in Ubuntu to open Terminal.
- Update Ubuntu package repository first.
$ sudo apt-get update
- Install Curl utility, if not there already.
$ sudo apt-get install curl
- Download the Latest version Anaconda3-2020.11-Linux-x86_64 using the Curl command. Replace it with your version, in case you require an old version of Anaconda for your project.
$ curl -O https://repo.anaconda.com/archive/Anaconda3-2020.11-Linux-x86_64.sh
This version is bundled with Python 3.8. In case you want to use Python 2.x. Then download a different Anaconda version. Visit the Archive link to download your preferred Anaconda version.
Step 1.3 – Verify Download MD5 Checksum for Anaconda installer script
This is a crucial step and must be followed for all ISO images, software and scripts. Especially if you are installing it in Linux.
Matching Checksum value helps to confirm the authenticity of the software. Also gives assurance that it’s not malicious and safe to install.
- Run md5sum command to get key associated to Anaconda3 script.
$ md5sum Anaconda3-2020.11-Linux-x86_64.sh
The output will be a series of number as shown in image (highlighted in red).

- Now Visit https://repo.anaconda.com/archive/ and search for your Anaconda version in the list. Match your MD5 checksum key listed on the Anaconda website against your anaconda version.
For example in our case, it’s matching. So we are good to go with further Anaconda installation

How to Install Anaconda in Ubuntu 20.04
Installing Anaconda in Ubuntu is quite simple, Just Follow theses steps –
Step2.1 – Run Anaconda3 bash script
You would need to run the Anaconda3-2020.11-Linux-x86_64.sh script file to install Anaconda in Ubuntu 20.04.
For that, go to your download directory, where you saved the Anaconda script. Then run the bash command to execute the script.
For example, I will change my directory to ~/Downloads and then execute script.
$ cd ~/Downloads
$ bash Anaconda3-2020.11-Linux-x86_64.sh
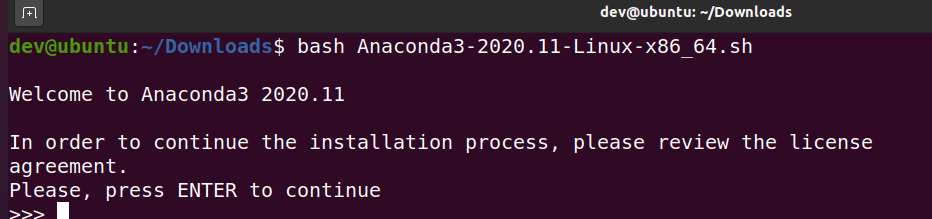
Press “Enter” to install Anaconda in Ubuntu Linux.
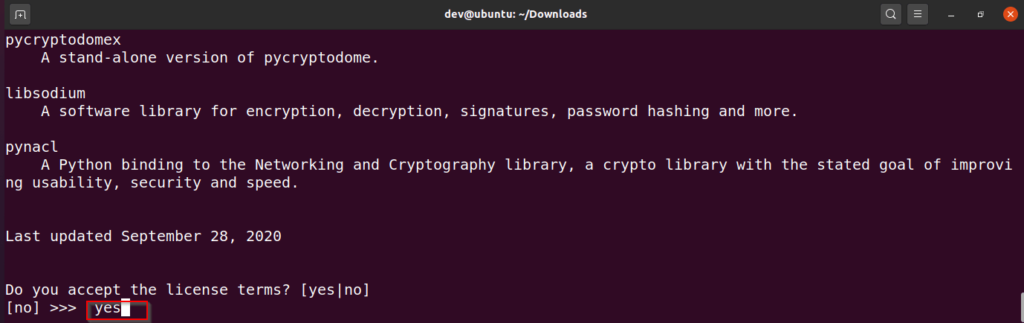
Step2.2 – Accept End User License Agreement (EULA)
Type “yes” to accept License agreement and continue.
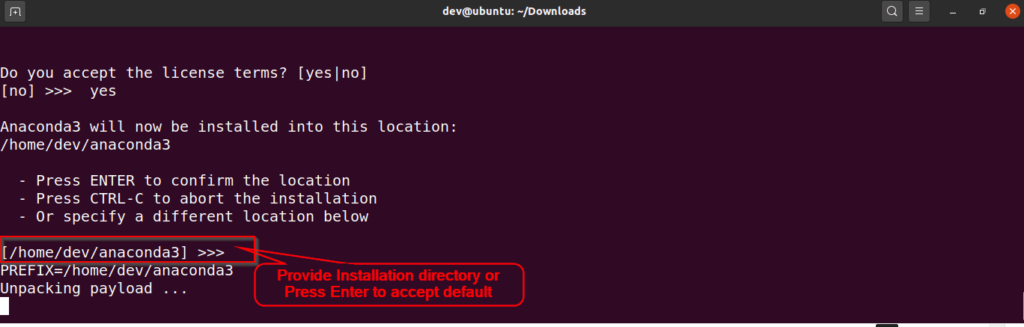
Step2.3 – Choose Installation Directory and Install Anaconda3
On this screen, provide the installation directory to install Anaconda in ubuntu, if you wish. Otherwise, you can simply hit “Enter” to accept the default.
For example, my default suggested installation directory is /home/dev/anaconda3. I will hit “Enter” to confirm the location. The same directory will be the environment location of Anaconda.
Sample Output :
As soon as you will hit “Enter“. The script will take these actions and will install Anaconda in Ubuntu 20.04–
- Unpacking of packages
- Provide a package plan, like which package will add or update.
- Give you a list of new packages that will be installed
- Install all packages and finish the Anaconda installation
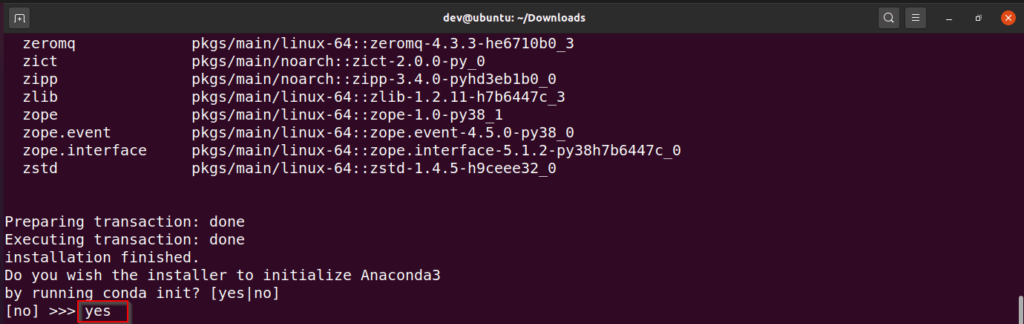
Step2.4 – Initialize Anaconda3 using conda init
At this point, Just type “Yes” to allow installer to initialize Anaconda3 by running “conda init” command.
Sample output :
Step2.5 (Optional) – set the auto_activate_base parameter to false
If you want that conda’s base(root) environment should not be activated on startup. Just disable the auto_activate_base parameter to false using the conda command.
This step is completely optional and depends on your preference. If you decide to disable it, then you need to activate it every time to get Anaconda environment in terminal.
I will not disable it in this Anaconda tutorial.
$ conda config --set auto_activate_base false
Step2.6 – Reopen current Shell for changes to take effect
Close and reopen terminal.
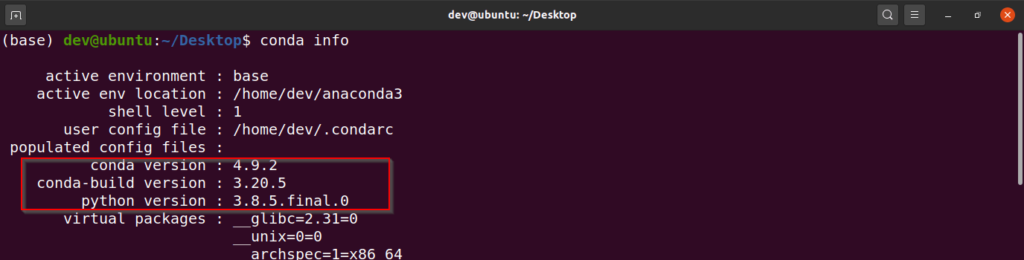
Step2.7 – Check Conda version
To check Conda, Conda-build and Python version, run the “Conda info” command. You can see Conda 4.9.2 and Python 3.8.5 got installed in our case.
$ conda info
Sample Output :
Congrats!! you have successfully installed Anaconda in Ubuntu.
How to run Anaconda in Ubuntu using CLI and GUI
When you install anaconda in Ubuntu, you get a lot of bundled scientific packages with it like Spyder, Python and Jupyter notebook.
Anaconda can be run using CLI and GUI both. If you are a CLI (Command Line Interface) fan, you can use Conda to run on the Linux terminal.
In the case of GUI (Graphical User Interface), Anaconda navigator can be used to manage conda packages, environment and launch applications.
I will show you both methods (Conda and Navigator) to create your first program. Just follow along :-
Step3.1 (CLI Method) – Create and Activate Anaconda environment
Let’s create our Test environment and then run our first program in python3.
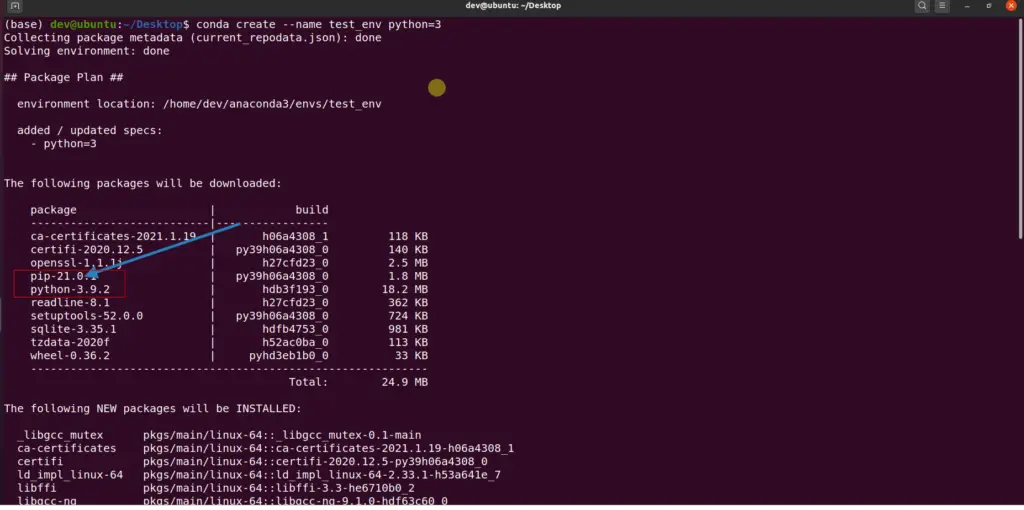
Step3.1.1 – Create Conda environment
Run the “conda create” command to set up our first test environment (test_env) with python3. It will also install the latest Python 3.9 and Pip 21.0 packages.
$ conda create --name test_env python=3
Step3.1.2 – Activate conda environment
Run the “conda activate environment_name“ command and the prompt will change. For example, I am in (test_env) as shown in the image. If you will Execute the conda activate command without environment name. It will drop you in the default base (root) environment.
$ conda activate test_env

Step3.1.3 – Run your first python program
Now run Python and Type print(“your first program“) and check the output.
$ python
# Type your first program code"
>>> print("Welcome to Anaconda! World")
output should be “Welcome to Anaconda! World” as shown in image.
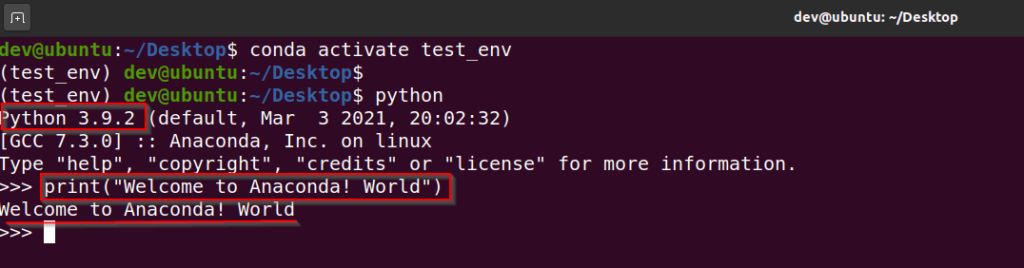
Make a note of the Python version. It’s 3.9.2 different than bundled with Anaconda 3.8.5. Press <Ctrl + D> or type exit() to exit from Python shell.
Step3.1.4 – Deactivate Conda environment
To deactivate and come out of the conda test environment. Type this command :
$ conda deactivate
Step3.2 (GUI Method) – Run Python in Spyder IDE using Anaconda navigator
Just to make things interesting, I will show you how to run your first program in Spyder. But this time we will use an Anaconda navigator.
So follow these easy steps –
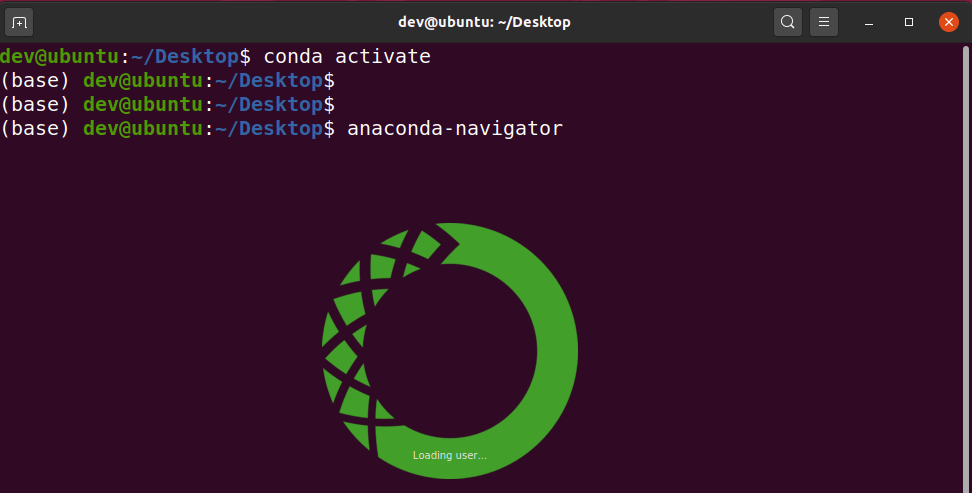
Step3.2.1 – Launch Anaconda Navigator from base conda environment
Open terminal <Ctrl + Alt + T> in Ubuntu and launch “anaconda-navigator“. Please make sure, you must be in the base conda environment. Otherwise, you will get “anaconda-navigator: command not found“.
$ conda activate
(base) :~/Desktop$ anaconda-navigator
It will launch Anaconda Navigator in Ubuntu.
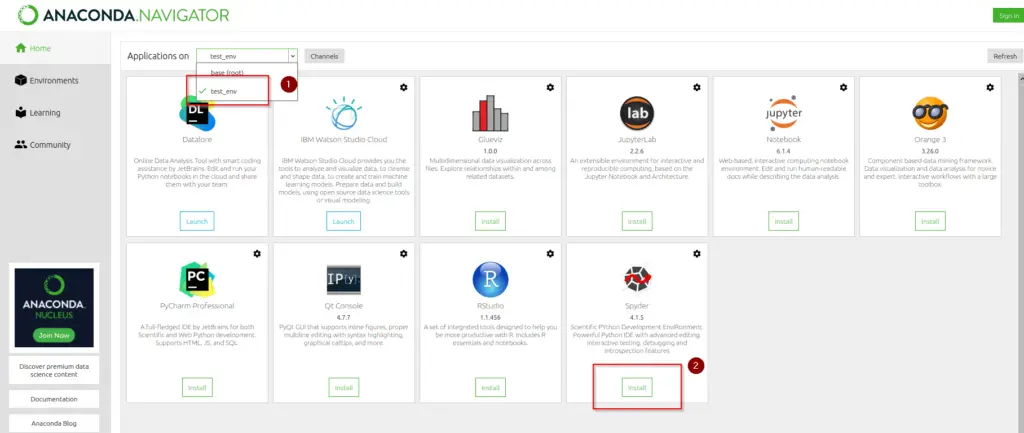
Step3.2.2 – Select your test environment (test_env) and install spyder
You can launch Spyder either in the base(root) environment or test_env created in Step3.1.1.
The only difference is, you need to install Spyder first and then you can launch it in your environment. In the base(root) environment, you don’t need to install it.
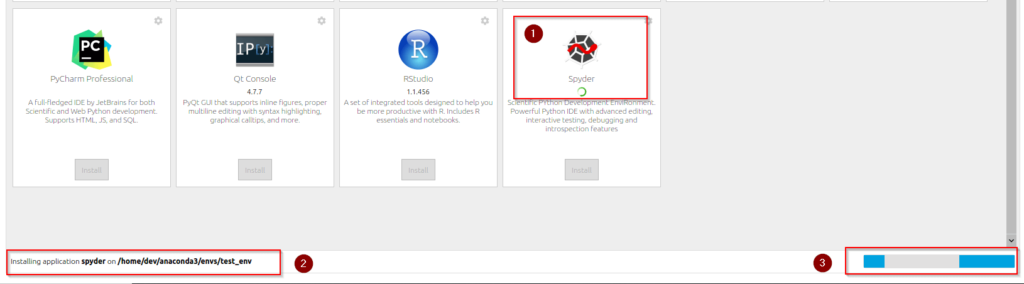
Select your environment and click on the “install” button in Spyder application.
Please wait and let Spyder installation complete
Step3.2.3 – Launch Spyder using Anaconda navigator window
Click on Launch button of Spyder application

Step3.2.4 – Run your first code in Spyder
Let me show you “How to use Spyder” by running a sample program.
** First Create a new “file” and save it
- Select File > New file or Press <Ctrl + N> on your keyboard
- Click on File > “Save As” or Press <Ctrl + Shift + S>. Provide a user-friendly file name and save. I will give the name “hello-world”.
If you are a Python programmer or developer. You can write any code you want. But if you are a novice, then you can paste this code as your first program.
# Test Spyder Program
def hello():
    """Print "Hello World" and return None."""
    print("Hello World")

# Main program begins here
hello()
- Press <Ctrl + S> to save file again. Now press F5 on your keyboard else click “Run” in the menu and then “Run” again in the drop-down to execute the program.
- You can change or Leave <Run settings> default.
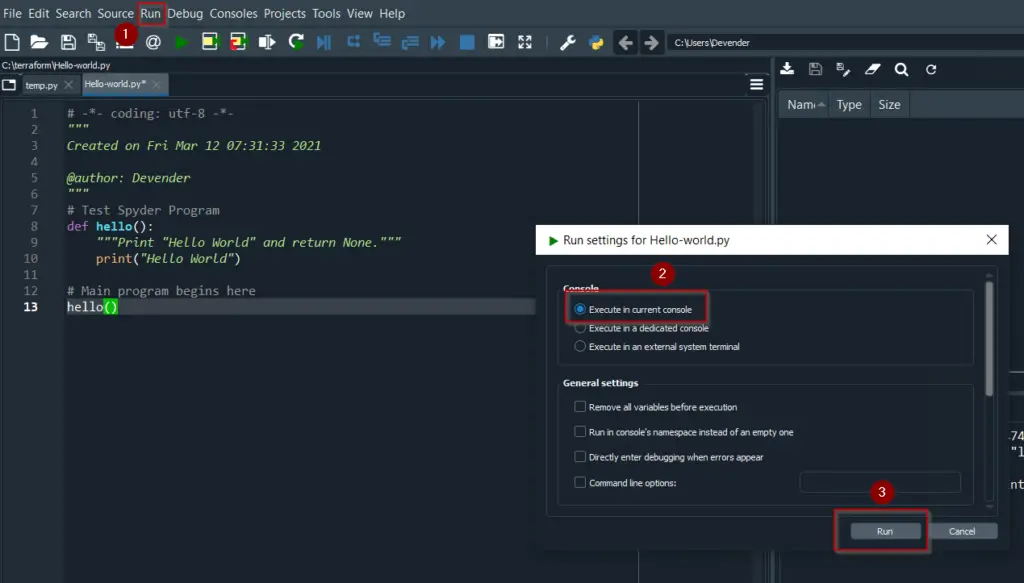
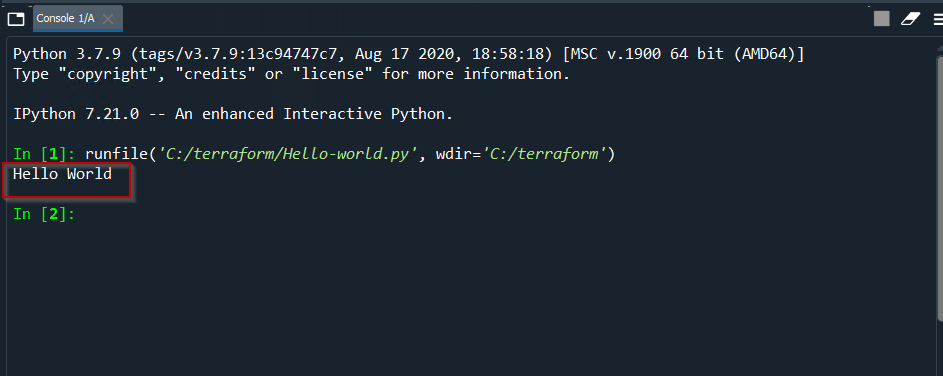
Once you will click on “Run“. It will print “Hello World” in output as shown in image.
Python 3.7.9 (tags/v3.7.9:13c94747c7, Aug 17 2020, 18:58:18) [MSC v.1900 64 bit (AMD64)]
Type “copyright”, “credits” or “license” for more information.IPython 7.21.0 — An enhanced Interactive Python.
runfile(‘C:/terraform/Hello-world.py’, wdir=’C:/terraform’)
Hello World
You can install Spyder without Anaconda and also have option to try it online first.
How to update Anaconda in Ubuntu
You can update Anaconda old version simply by executing these two steps –
Step4.1- Update conda utility
To update Anaconda in ubuntu to latest version, first update it’s conda utility.
$ conda update conda
Step4.2- Update Anaconda package
Now update Anaconda package using conda command.
$ conda update Anaconda
How to uninstall Anaconda in Ubuntu completely
Follow below mentioned steps to uninstall Anaconda in Ubuntu :-
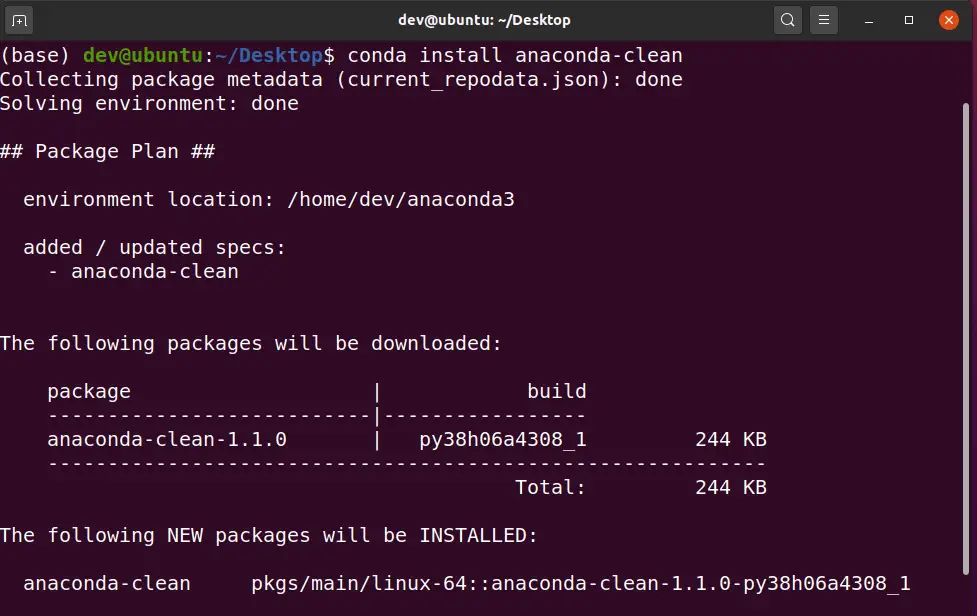
Step5.1 – Install Anaconda clean package
You can remove or uninstall Anaconda by removing the Anaconda installation directory. But this leaves a residue of anaconda as it’s not recommended procedure.
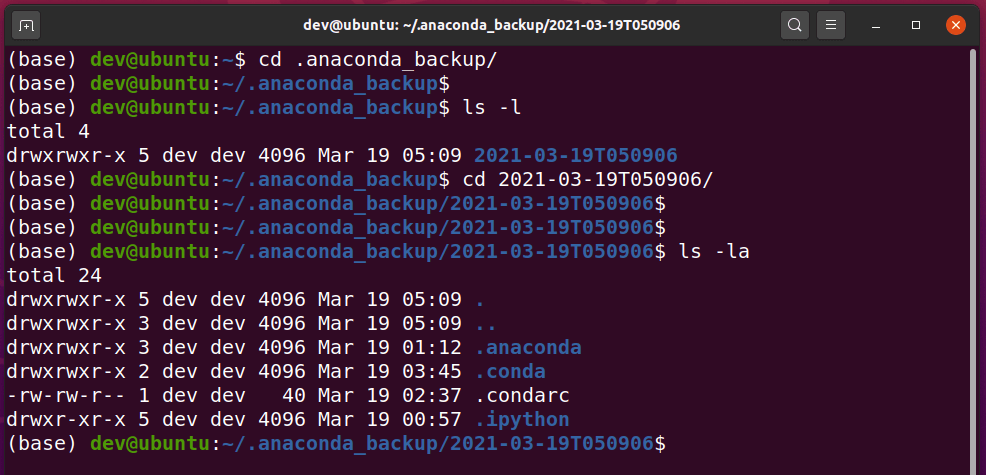
The anaconda-clean method doesn’t touch your data files in your project folder. Also creates a backup of all Anaconda files and directories in “.anaconda_backup” in your home directory.
To uninstall Anaconda cleanly from ubuntu, Anaconda-clean utility need to be run. So let’s first download Anaconda-clean package.
$ conda install anaconda-clean
Press “y” to install anaconda-clean in ubuntu.
Step5.2 – Clean all Anaconda related files and directories
Now run anaconda-clean utility and it will delete all Anaconda related files and directories for your Ubuntu system.
$ anaconda-clean --yes
- Option –yes will help you to delete all files and directories without prompting.

Below mentioned are the directories and files exists in backup .anaconda_backup directory created by anaconda-clean utility.
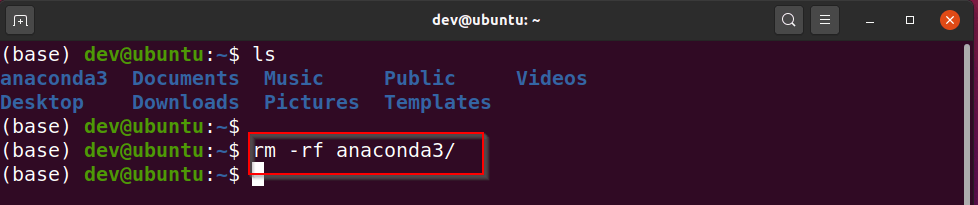
Step5.3 – Delete Anaconda directory using “rm” command
Delete ~Anaconda3 or ~Anaconda2 directory from your system using “rm” command. In my case it’s ~Anaconda3 directory.
$ rm -rf ~/anaconda3
Close and open Terminal again.
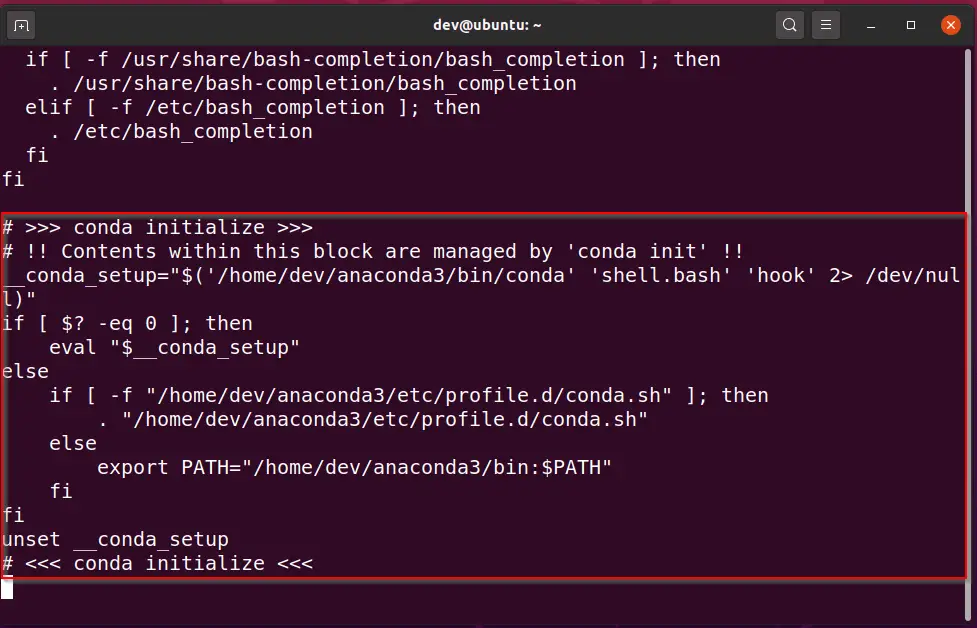
Step5.4 – Remove Anaconda path variable and “conda init” block
Check your .bash_profile or .bashrc file in your home directory and remove the “conda initialize block” if exist. For example, I will make a copy and then edit the .bashrc file.
# Make a copy of .bashrc file
$ cp .bashrc .bashrc_orig
# Edit file
$ vi .bashrc
- Delete this <<<Conda initialize>>> block from .bashrc file and save it.
>>> conda initialize >>>
 !! Contents within this block are managed by 'conda init' !!
 __conda_setup="$('/home/dev/anaconda3/bin/conda' 'shell.bash' 'hook' 2> /dev/null)"
 if [ $? -eq 0 ]; then
     eval "$__conda_setup"
 else
     if [ -f "/home/dev/anaconda3/etc/profile.d/conda.sh" ]; then
         . "/home/dev/anaconda3/etc/profile.d/conda.sh"
     else
         export PATH="/home/dev/anaconda3/bin:$PATH"
     fi
 fi
 unset __conda_setup
 <<< conda initialize <<<
Restart your terminal and you are done with cleanup of Anaconda3 in Ubuntu.
Video tutorial
Check out this video to install Anaconda in Ubuntu. If you like to watch instead of reading text.
Conclusion
Now you know how to install anaconda in ubuntu and ready to explore the world of scientific computing.
Let me know, do you like installing Spyder or Python with Anaconda or as standalone packages?. Please leave your thoughts in comment.


What if the MD5 does not match? How are we supposed to proceed?
The first thing is MD5 should match if you have downloaded it from anaconda.com. In case it’s not matching, that suggests the download is not complete. Please follow this
1.) Download it again and validate the MD5 Checksum key again. You can also check for SHA-6, in case the MD5 value is suspicious. Link for SHA6 hashes – “https://docs.anaconda.com/anaconda/install/hashes/all/”
2.) If are you are still not able to match it after repeated trials. Go for another version and report the problem with anaconda here “https://www.anaconda.com/contact”.
Let me know, in case you still face any issue.