The world is moving towards virtualization very fast, so am I. This post will help you install VMware Workstation Player on Windows 10 without any hassle. VMware workstation will make sure that your host operating system is intact if you decide to create VMs on it. Additionally, you have all freedom to play around with new Operating Systems and software. That’s also without spending any penny for a license until you are using it for education purpose.
Video Tutorial
If you don’t like reading, then you can enjoy this quick video. I have covered following topics –
- How to install VMware workstation player on Windows 10
- Removal of VMware workstation player from Windows 10
Steps to Install VMware Workstation Player on Windows 10
There are many virtualization software exists like VirtualBox, KVM, Hyper-V, Oracle VM and many more. But VMware workstation player is my personal favourite. I am using it for many years and never found any issues. Even performance is also pretty good compared to other competitors. That’s why I always prefer it.
Let’s deep dive further and check steps to install VMware workstation 16 –
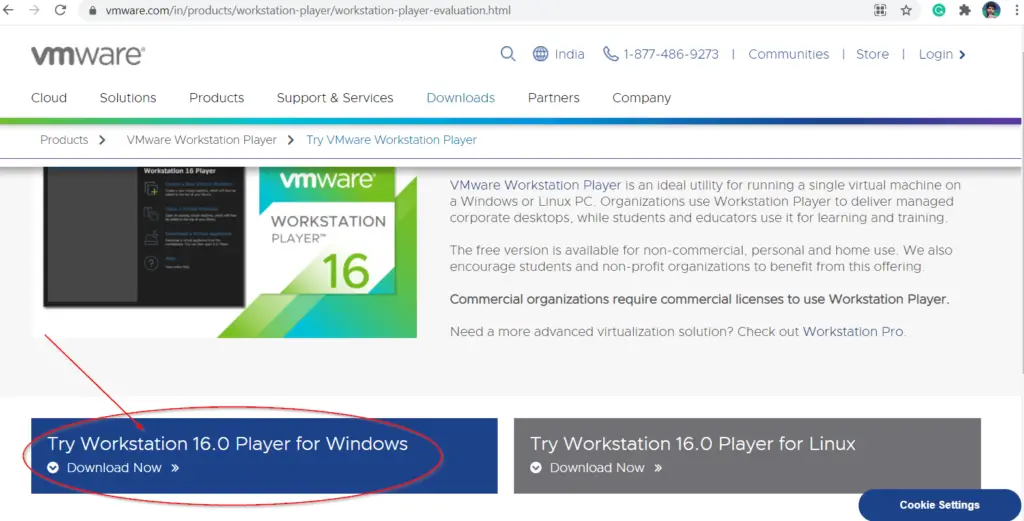
Step 1 – Download VMware Workstation Player 16 for Windows 10
Visit the “VMware website” website. Then click on “Download now” under “Try Workstation 16.0 Player for Windows“. Choose the “save file” option.
Alternatively, you can click here on “Download” and “Save” VMware-Player-16.1.0-17198959.exe file directly.
Step 2 – Visit your Download directory and run VMware Player 16 exe
Once the download completes. Go to your Download directory and double click on VMware-Player-16.1.0-17198959.exe file. This action will start VMware workstation 16 player installation wizard.

Step 3 – Click Next on VMware Workstation 16 player setup welcome screen
Click Next on “Welcome to the VMware workstation 16 player setup wizard” screen to move further.

Step 4 – Accept VMware End User License Agreement (EULA)
Like all other software, You just need to select checkbox for “I accept the terms in the License Agreement”. Then click “Next“.

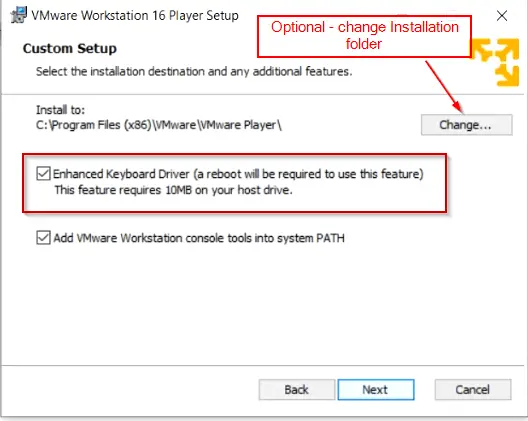
Step 5 – Select Additional Features
There are two additional features, you can choose on this screen.
- Enhanced Keyboard driver – I will recommend you to enable this feature. It will improve your keyboard interaction with guest VM. Although it will ask to you reboot your computer and will eat up 10MB of extra space on your disk.
- Add VMware workstation console tools into system PATH – Selecting this option will automatically add VMware console tools to your system PATH.
Enable both additional features and click Next .
Step 6 – Select User experience settings for VMware Workstation 16
On the user experience settings, you will again find two options –
- Check for Product updates on startup – VMware checks for new updates while starting. So it’s solely your choice. If you want to keep this option enable or not. I don’t like enabling this personally.
- Join the VMware Customer Experience Improvement Program – Enabling this option will collect technical logs and send it to VMware for further improvement. Again it’s optional if you want to keep this enabled or not. I will keep this enabled for my setup.
Click Next

Step 7 – Create VMware Player 16 Shortcuts
Keeping these options enabled will create VMware Workstation 16 Player shortcuts on Desktop and Start menu.

Step 8 – Click “install” to start VMware Workstation Player installation
Hit “Install” to begin VMware Workstation player installation. At this time you can also click “Back” to review or change any of your installation settings. Below mentioned action will be taken during installation related to VMware workstation only –
- Installation validation
- Setting up custom registry permissions on VMware Keys
- Removing duplicate files
- Updating registry keys
- Copying new files
- Installation of virtual network drivers
- Cleanup of legacy network drivers
- Installation of VMCI drivers
- Cleanup of installation files

Step 9 – Click Finish and restart your PC to complete VMware Player 16 installation
Click Finish to install VMware workstation player on Windows 10 and reboot your PC.

Step 10 – Launch VMware Workstation 16 player
Once your machine is back online after reboot. Launch VMware Workstation 16. It may ask you for License, select for ” Personal use” {non-commercial}. I am sure you will follow the guidelines of VMware on this.
If you want to use it for commercial purpose, you would need to buy VMware license key.

Hurray!! You have installed VMware Workstation 16 player in your Windows 10 PC. Now you can start creating virtual machine. Click on these buttons to check out interesting tutorials –
How to Uninstall VMware workstation player on Windows 10
If you will notice, I always try to cover the installation and uninstallation of the software. This goes with VMware workstation also. Let’s see how easily we can remove VMware workstation player from your windows 10.
1 – Search and open “Control Panel” from Windows search bar

2 – Click Uninstall a program under “Programs“

3 – Select VMware player from list of Software and click “change“.

4 – Click Next on Welcome screen of VMware workstation setup

5 – Select Remove option from VMware Workstation 16 player setup
Click on Remove to uninstall VMware Workstation Player from Windows 10. Although, you can also repair installation and change VMware workstation features using this wizard.

6 – Click Next on Preserve VMware Workstation 16 player configurations
On this screen, you will get the option to preserve your product configuration and license information. If you are not willing to use this VMware software again in future. You can simply uncheck these options and click Next.

7 – Click Remove to uninstall VMware Workstation 16 Player from Windows 10

8- Finish to complete Uninstallation of VMware Player 16

Conclusion
I hope, now you can easily install VMware workstation player on Windows 10 machine and can start your Virtualization Journey. I am sure, even if you are a novice, it will be a cakewalk for you.
Let me know, if you have any feedback or suggestions for improvement.