This post on the Dell driver update will give you the ways to update your device drivers. This will be more focused on driver updates using Manual and Dell support assistant utility. Whether you own a Laptop, Desktop or a server, regularly updating drivers help you to keep your system optimal. Drivers are important programs that interact between application and hardware. So you should really take good care of them. Because if they become outdated or old, You may face issues in your system
Requirements to perform Dell driver updates
- Internet connection
- Dell service tag number
How to check Dell service tag
There are two simple methods to find out Dell service tag of your Dell Laptop, Desktop or server.
- Manually by checking your service tag sticker
- By running the command in Windows 10
1.1 – Locate Dell service tag manually
To find out the service tag of your Dell laptop or desktop. Look for a similar sticker as shown in the image. This service tag “ABCD123” is just for demo purpose. You will find your service tag number instead. Make a note of it and keep it handy. It will be further used in this tutorial.

1.2 – How to find Dell Service tag in Windows 10
The alternate way to find out dell service tag is using command line. Follow steps as follows –
Step 1.2.1 – Open command prompt in Your Windows 10
Type “cmd” in search bar of Windows 10. click on open.

Step 1.2.2 – Type “wmic bios get serialnumber” command to check Dell service tag
Using the wmic command, you can find out the Dell service tag in Windows 2008 and 2016 also. This command is really helpful to find out the Dell service tag, in case your sticker is missing.
C:\> wmic bios get serialnumber

The serial number shown in output is actually “Dell service tag“.
How to perform Dell driver updates
These are the two methods, By which you update Dell drivers on your system easily –
- Manually downloading and updating Dell drivers
- Automatically by using Dell support assistant software {Recommended}
Let’s deep dive and check these options one by one :-
2.1 – Dell driver update in Windows 10 manually {First Method}
If you don’t want to install any extra software on your pc and perform Dell driver updates occasionally. Then below mentioned steps to perform Dell driver update in Windows 10 will help you –
Step 2.1.1 – Visit Dell website for latest Drivers and Downloads
In this step, Visit ” Dell website” to download latest drivers for your Laptop, desktop or server.

Step 2.1.2 – Enter your “Dell service tag” and “Search“
Now you need to put “Dell service tag“, we found in “Step 1.2.2“. In the worst case, if you are not able to figure out your Dell service tag. Then you can provide Product ID or model details of your system in the search field. Although putting a Dell service tag is the best method to get the latest suitable drivers for your device.

Step 2.1.3 – Select Dell driver update option “Automatic or manual”
Once you will put your “Dell service tag” and click on the “Search” box. You will land on the product page of your device. For example, I got my Laptop product page.
On this page, you will get two options –
- Let Dell automatically find driver updates for you – If you will select this option and click on “Check for updates“. It will check whether the “Dell Support Assistant” is installed or not. We will talk about Dell support assistant later in this post. So stay tuned.
- Manually find a specific driver for your “Device Model” – This option allows you to find out a specific device driver for your Dell system. This option is really helpful if you are looking for individual drivers like Video, Audio or Wi-Fi. But you have to manually feed details like Operating system, Category and Format etc.
Both options are shown in below mentioned image. You can select any one of them.

Step 2.1.4 – Select device category and click “Download” for latest driver available
Below mentioned is the comprehensive list of Dell driver updates. Click on Download and save it. Click on “Show All” to get list of all drivers.

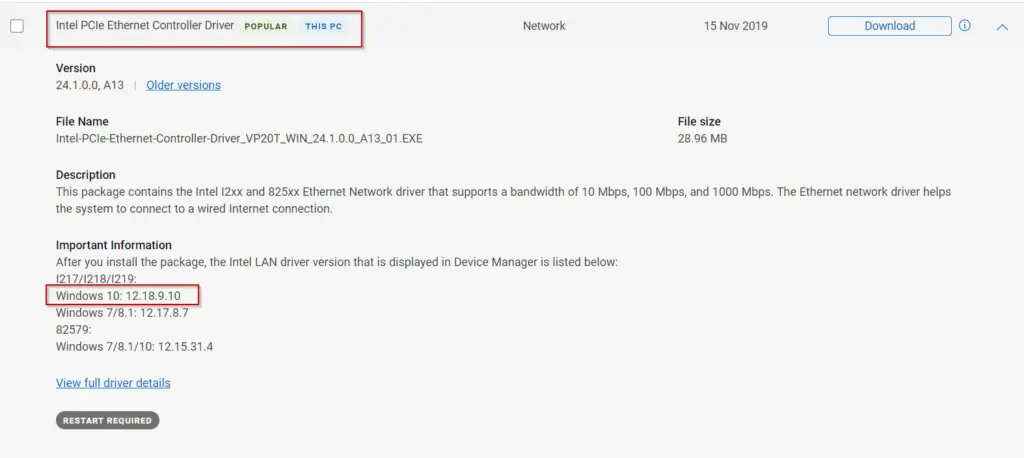
To get more details of any driver. Just click on the “Dropdown arrow” in the <right corner of each driver>. For example, I will check the “Intel PCIe Ethernet controller” driver details. It also let you know, whether a restart is required or not after driver installation.
Please make a note of version, which will be installed. For example, driver version is 12.18.9.10 for Windows 10 as highlighted in my case.

Step 2.1.5 – Install Dell driver updates on your Windows 10 system
Visit your Download directory. Double click on the “Your_Driver_exe” file. For example, I have downloaded “Intel-PCIe-Ethernet-Controller-Driver” to show the installation process. These steps will be applied to your device drivers as well.
Select “Yes” in User access control permission.
Step 2.1.6 – Click “Install” to update dell drivers for your device
On this screen, You will have two options –
- Install – Selecting this option will install or update your system with required device drivers. For example, it will update my Intel PCIe ethernet card drivers with version 12.18.9.10.
- Extract – Only extracts the content of the software update. It will not update anything on your system.
Select “Install” Option and continue for your device driver update.

Step 2.1.7 – Update installer operation is successful
Dell driver update will happen in the background and you will get the “Update installer operation is successful” window. You can also “view installation log” if required.
Click Close and reboot your system once.

Step 2.1.8 – Verify device driver updates for your device
Now my Intel Ethernet driver must show “version 12.18.9.10 in the device driver details. Let’s verify in device manager.
- Type “Device Manager” in the search bar of Windows 10 > Double click on Device > Go to Driver tab.
- Look for the updated device driver version. For example, I will look for “Intel Ethernet card“

Congratulations!! you have successfully installed the latest available drivers for your device using the manual method. Now let’s discuss the Dell-recommended method “Dell Support Assistant“.
2.2 – Dell driver update automatically using Dell Support Assistant {Second Method}
If you are a bit lazy like me and want to keep all drivers up to date without manual efforts. Dell support assistant utility is for you. You can automate and update all device drivers, chipset and Dell recommended software without hassle.
Follow along step by step for Dell driver updates automatically on your laptop or desktop –
Step 2.2.1 – Dell Support Assistant Download path
Visit Dell website to get latest “Dell Support assist for PC” software. Alternatively, Click on below mentioned Download link to get it.
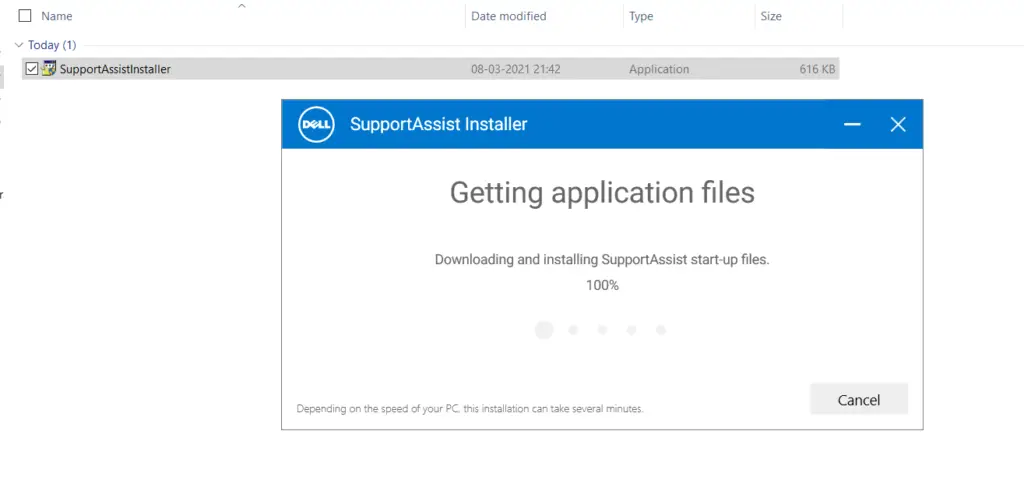
Dell support assist size is around 616 KB because complete setup will be download during installation.
Step 2.2.2 – Run “SupportAssistInstaller.exe”
Visit your “Download” directory and <Double click> on “SupportAssistInstaller.exe” to install this utility. Select “Yes” to allow User access control. Now “Support assist installer” will download and install startup and application files. Depending upon your internet speed. It will take a couple of minutes to complete the installation in background.

Step 2.2.3 – Launch “Dell support assistant”
- Type “support assist” in Windows search bar and click “Open“.

- Select “Remind me later” on the profile window. It’s totally your wish, you can select the complete profile also. Completing the profile will get you quick support, in case of an issue. I will skip this for now.

Step 2.2.4 – Start “Dell SupportAssist” to run tests
As soon as you will select “Start Now” on the Support assist welcome page. Dell support assist will run the below-mentioned tasks automatically one by one on your system.
- Get Drivers and Downloads – Scan for device required driver updates
- Scan and Test hardware – CPU, RAM and Hard disk scan for any hardware issues
- Clean files – File system errors and issues check
- Tune performance – Optimization of the system performance
- Optimize Network – Optimization of network
- Remove Viruses and Malware
You can cancel these test any time but I would suggest to let it run at least once.

You can check logs of all these tasks in “History” > “System Activity History” section of support assist. For example, you can see action taken by Dell support assist to tune performance of my Dell laptop.

Step 2.2.5 – Dell drivers update using Dell Support Assist
As I explained in the last step. Dell Support assistant will automatically scan and provide a list of the device driver updates . For example, it’s showing two updates in the image.

- Select “Install” to download and update device drivers.

Step 2.2.6 – Save your work and Reboot your Dell system
Once all drivers will get update, Dell support assistant will ask you to Restart your system. So quickly save your work and restart.
Hurray!! Now you are ready with latest drivers and update in your system.
Video Tutorial
Watch out this amazing video from Dell in case of any doubts on Dell drivers update using support assistant utility.
Conclusion
I hope Dell driver updates using manual and Dell support assistant will be a cakewalk for you. So time to keep your system and yourself healthy.
Which method do you preferer out of the two? Please let me know, through your comments.
Happy Learning!!


