If you are thinking to migrate your WordPress website to a new domain due to any reason, this step by step tutorial on “How to transfer WordPress site to new domain on Bluehost” will be really helpful. I have recently migrated one of my colleague’s website to a new domain, and I will explain everything in details so that you don’t have to face the challenges or difficulty, I faced.
One fine day, one of my friend called me and discussed the problem of his existing domain, and asked me to help him, to transfer his WordPress site to a new domain. Being technical I was ready to take the challenge and his hopes were high on me :-). I told him that, I will be doing this migration the first time, but I will definitely help him out in this situation.
In my tutorial, I have talked about WordPress + Bluehost (as a website hosting company) but the steps will more or less the same for other hosting companies, you just need to check their manuals. WordPress steps will be common for all despite website hosting.
Before doing these kinds of migration, your planning must be perfect. There is a famous quotation, “Measure twice, Cut once” in our Technology profession. You have to plan and recheck before doing any changes.
So I gathered requirement, made a plan and executed it. I will refer to the old domain name as “old.com” and the new as “new.com” for further references in this “How to transfer WordPress site to new domain on Bluehost” tutorial.
A high-level Site transfer Plan to a new domain
- Information gathering about existing domain (old.com) and Website
- Buying a new domain “new.com”
- Assign a new domain to Bluehost
- Duplicate or Take website backup using Duplicator plugin
- Create a new database for the “new.com” domain
- Contact Bluehost support to make “new.com” as primary
- Unpack WordPress to “new.com” domain
- Setup redirects (301) from “old.com” to “new.com” domain
- Google search address change
- Notify your social media channels about “new.com”
Before exploring the above-mentioned plan, a few things you need to beware and keep in mind before migrating your website to the new domain, this change or migration will impact your search traffic and search engine rankings.
But it’s quite normal and if you will follow this tutorial step by step, you can reduce SEO impacts for sure.
So let’s follow the plan
Information gathering about existing domain (old.com) and Website
The first step is to gather information about the website and “old.com” domain. Try to gather information around these parameters –
- Website is live, already added and working fine in Google search console
- Number of Plugins installed
- A track of numbers of posts and pages
- Existing username and passwords details for all Authors
This information is really necessary to jot down, just to make sure that your pre and post-migration WordPress website looks the same. It will help you to validate it after migration to a new domain.
Buying a new domain “new.com”
If you are planning to migrate your old domain to a new domain, you need to purchase a new domain for sure, My friend purchased it from Godaddy in my case, you are free to buy it from any domain name provider who can offer your favourite domain name on cheap rates or discount offers.
Most of the times, buying a Domain name for more than a year gives you a good discount rate. Now you need to make Nameserver changes for your website hosting provider, Bluehost in my case.
Step1:-
Login to the Godaddy website and it will redirect you to the “All products and service” page, where you can see your “new.com” domain
Step2:-
Click on DNS and it will take you to the domain manager page – Go to nameserver (NS) settings –
Step3
Click on change – select “I will use my own nameservers“ – Add your website hosting name servers – click Save, I added Bluehost name servers, in my case. This step is really necessary as it takes approximately 1 hour to 4 hours to get this update.
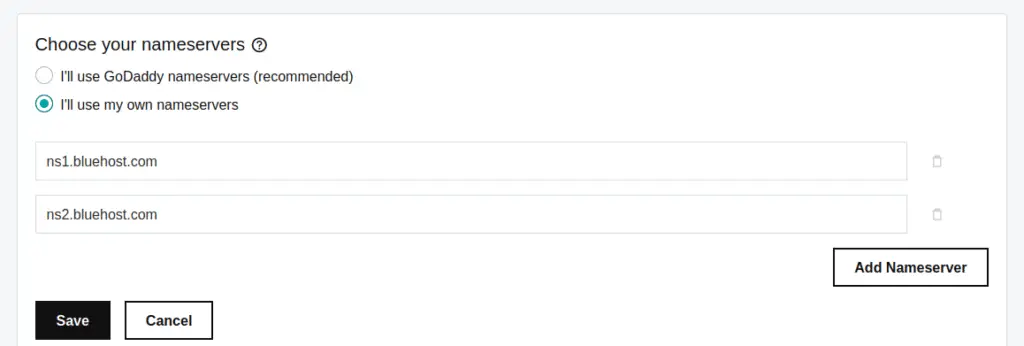
This step will also avoid hassles during Bluehost chat support, as the first thing they will ask you “Have you updated Nameservers for your new domain”? So you will be ready with the answer “Yes” if you will follow my advice about updating Nameserver in advance.
Now after 1-4 hours, Check your new name servers updates on any site like mxtoolbox.com, it will reflect the new name server entries for the “new.com” domain. In my case, it reflected the correct Name servers of the Bluehost website after one hour.
Assign a new domain to Bluehost panel
Now it’s time to add your “new.com” domain to Bluehost (or your website hosting provider). Because it is the second question asked by Bluehost Chat executive “Have you added the new domain to Bluehost?“
Here I am going to showcase Bluehost steps, you may need to check the manual of your website hosting vendor to perform these steps.
Step1-
Login to C-panel of Bluehost – Click on Domains in left side panel – click on Assign from submenu – Select option “Use a domain that is not already associated with your account“ – once you provide a new domain name

Step2-
You need to verify ownership of it, by using any of the three options –
- Name Servers: Verify ownership by updating Name Servers to ns1.Bluehost.com and ns2.Bluehost.com
- A Record: Point your “A” record to provided IP address
- Create HTML Page: on the existing host
Option1 is the simplest one and If you are following my tutorial on “How to transfer WordPress site to new domain on Bluehost” step by step, we have already updated NS records, so you can easily go to the next step.
Step3-
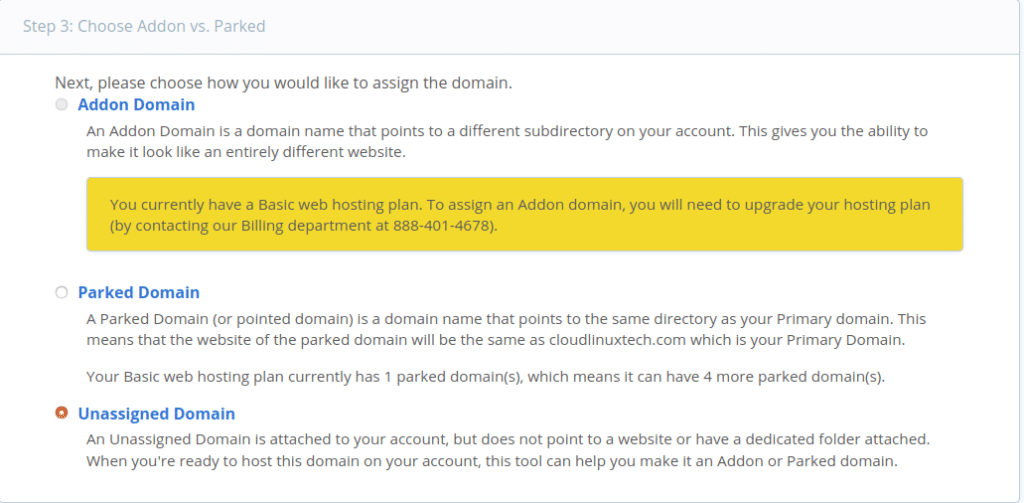
Choose Addon Vs parked domain – you have three options to select
Addon domain–
This gives you the ability to create one more website by creating a new subdirectory in your current account.
*Note:– if you have a Bluehost Basic web hosting plan, you can’t add your domain as an addon domain. You would need to upgrade your hosting plan by calling Bluehost personnel.
In our case, if I will add “new.com” as an Addon domain, I will have the freedom to host one more website by creating a subfolder in the current account.
Parked Domain –
A Parked Domain is a domain pointing to the same directory where your primary domain is hosted. To understand it in simple terms, If I will assign my “new.com” domain as a Parked domain, it will point to the same website hosted on “Old.com”.
This scenario can be used where you want to promote the same product on your website, but want to change the domain name.
Unassigned domain –
The unassigned domain is the domain that is not in use currently. If you have assigned your domain as an unassigned domain, then it’s not pointing to any website or subfolder in your account.
In our scenario, we can assign the “new.com” domain as a parked or unassigned domain. once done, Tap on “Assign this domain“.
I selected the Unassigned domain, Just to make things simple for Bluehost executive on chat support.
Duplicate or take website backup using Duplicator plugin
Now we need to duplicate or take a backup of our website so that restoration can be done and all kind of risks can be mitigated in case of issues during migration.
There are many plugins to perform website backup but I would suggest you Duplicator plugin because it’s free and it was easy to use and performed well.
To install the Duplicator plugin, just go to the plugin section of your WordPress site admin – Add new – and search of “Duplicator plugin” – Click on install and then Activate.

Duplicator plugin will be now available in the WordPress panel.
Steps to duplicate website –
Step1-
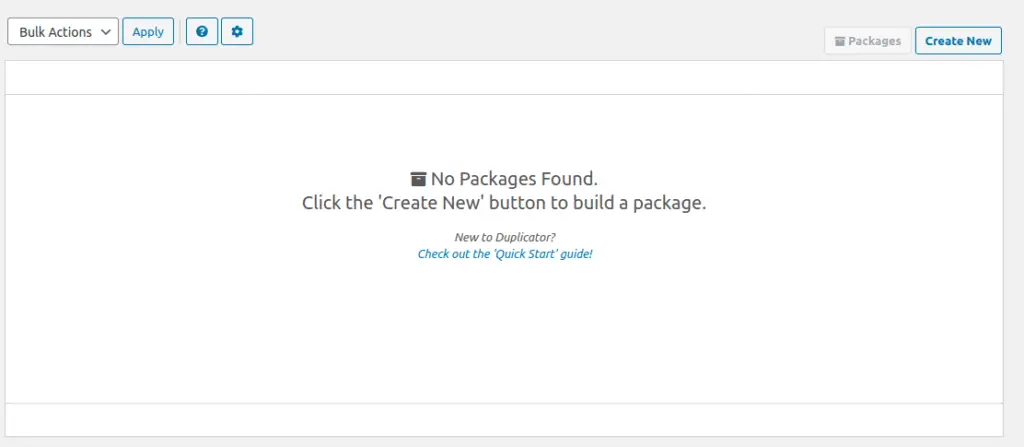
Click on the packages submenu in the Duplicator menu in the WordPress admin panel, click on create new
Step2-
Click next to start duplicator wizard, it will start some pre-checks test, if everything is good, then you click on Build.

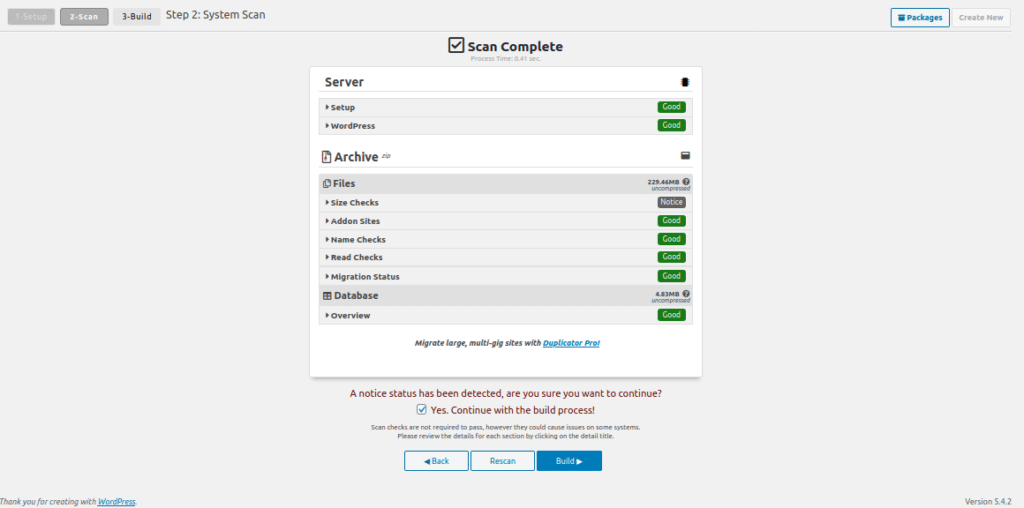
This plugin will take some time to build a package of your website, depending upon the site size. Once the build is finished, Tap on “one-click download“, it will download “installer” and “archive file” to your PC.

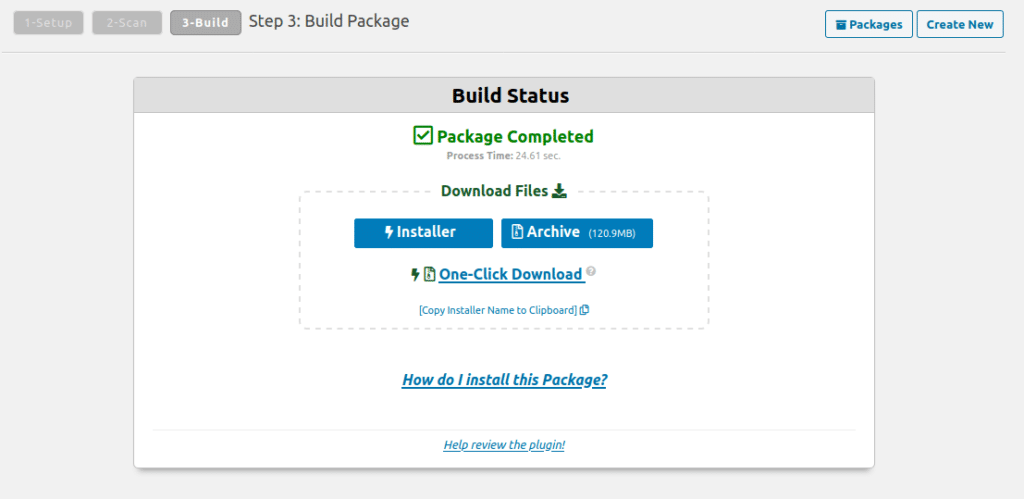
The installer file is an automatic installer to extract or unpack your archive file, while the archive file contains the backup of your website.
Create a new database for the “new.com” domain
Now, time to create a new database for the “new.com” domain. I will show you the steps for Bluehost but hope you will be aware of your c-panel and can create it easily.
Step1 –
Login to your C-panel and go to the Advanced menu
Step2 –
Go to “Mysql Database Wizard” and by following the wizard, create a new Database
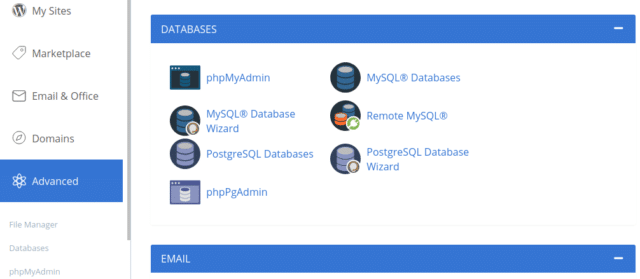
Make a note of DB name, Username and password. It will be required during website restoration steps.
- Give DB name – for your new domain
- Create a new DB Username and password
- Add newly created user to database (you can find this option in C-panel – Advanced – MySQL databases – Scroll down on right panel of Database pane – Select Add user to the database. Here Select your User and Database name created a moment ago.
Contact Bluehost support to make “new.com” as primary
When you are ready with the above steps, now you need to open a chat session with Bluehost support Ask them to make your “new.com” domain primary instead of the “old.com” domain.
The executive will do some security check and may ask you why you wanna do this change, once you will provide your reason, the executive will share this link and will ask you to send your consent over the chat.
You have to “Agree with warning and Terms mentioned in the link” and need to give your confirmation, that still you want to change your primary domain from “old.com” to “new.com”
As soon as you will send your agreement on chat, the Executive will change your “new.com” domain as primary and will assign your “old.com” to a parked domain.
You must validate it in your Bluehost c-panel Domains menu and can close the chat.
Transfer WordPress site to new domain
Now you need to connect to your website using File Manager or FTP client.
Delete all files from the root directory “/home/public_html” of your website and upload Installer.php and archive file you downloaded earlier.
Once upload of both files is done, Open URL “http://new.com/installer.php”. Replace “new.com” with your new domain name.
It will open duplication wizard and now you just need to follow this wizard.
Step1 –
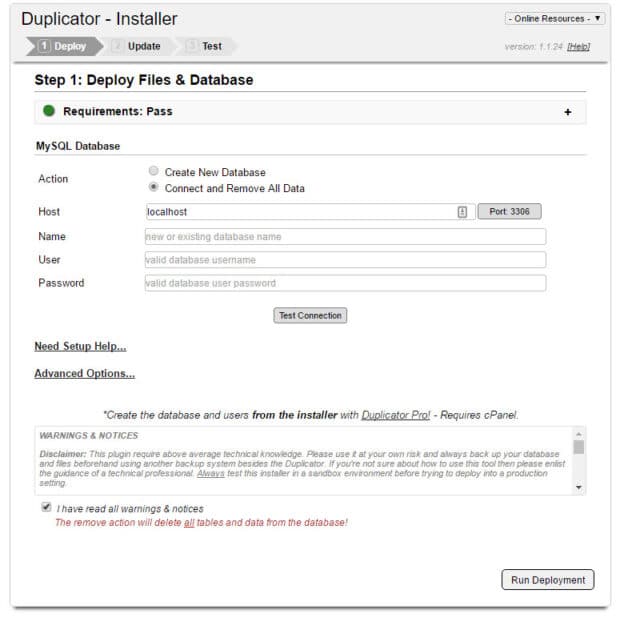
The installer will look for an archive file in the same folder, and then you need to agree with the terms and condition.
Step2 –
Now the installer will ask you to fill Database information, which we created earlier. The hostname is generally localhost for everybody.
Once all information has been filled in, Test Connection. If all good, click “Run Deployment”
Now duplicator wizard will unpack all files to your new Database.
Step3 –
It will ask you to update the site URL, Path and Title, it generally takes a new site name by default, but if you can’t see the new name, Fill it and you are good.
In this step, the Duplicator plugin will search and replace the old domain name with the new domain name from the restored database.
Step4 –
Duplicator will now finish the wizard and ask you to log in by clicking on the “Admin login“ button.
Once login is done, it will automatically delete installer files, if not then you can manually delete all files from root folder and file with the name having “Duplicate” in it.
Validate that you can open your website with a new domain name now.
Watch this video from WordPress on duplicator plugin
Setup redirects (301) from “old.com” to “new.com” domain
Now you need to set up permanent redirects for your website from the old domain to the new domain for the search engines and from an SEO perspective.
The old domain “old.com” is currently assigned in parked mode, So it will automatically point to the old website but in future, this may expire or you may want to get rid of it, So setting redirect (301) is necessary
you can do it by .htaccess file or Bluehost C-panel.
If you are doing it using the .htaccess file in your website root directory, paste this code to the end of your file, if you don’t find this file (click on settings – check “Show hidden files(dotfiles)” in the right top corner of the file manager otherwise you can use C-panel to setup redirects.
new.com is your new domain in the code.
#Options +FollowSymLinks

RewriteEngine on

RewriteRule ^(.*)$ http://www.new.com/$1 [R=301,L]
If you want to set up it using Bluehost C-panel
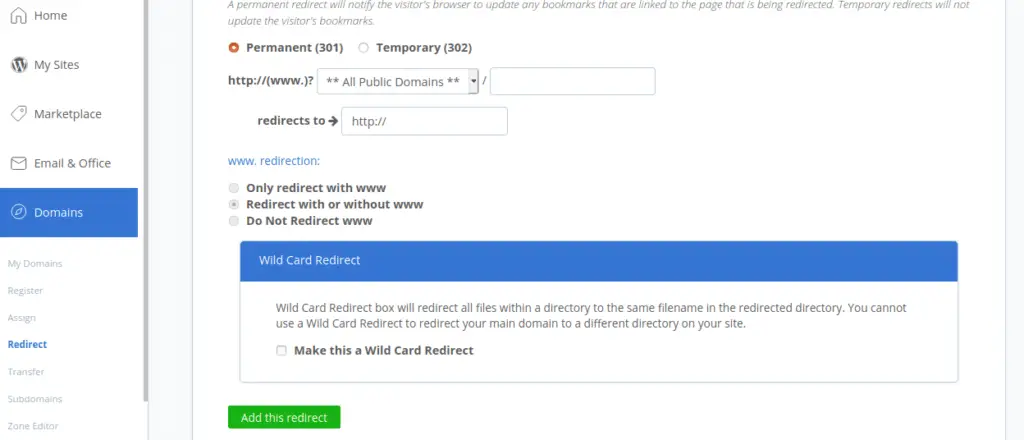
Login to C-panel – Go to domains – Click on Redirects – Select a permanent (301) option.
Select “HTTP://(www.)?” field – Enter (old.com) from the drop-down list – Select “redirects to” field Enter new website(new.com) URL and then click on “Add this redirect“, leave other options as default.
This will redirect, your “old.com” website home page to the “new.com” URL.
You can redirect canonical URLs also as recommended by Google.
Google search address change
Once you are done with all the above-mentioned steps and you have validated your new site is working fine. You need to tell Google about your changes so that it won’t impact on your traffic and SEO
For that you need to login to the Google search console – Add property – Provide a new website URL.
Now Go to setting – Click on Change of Address – on the next window – Google will run the wizard to
- Select you to new site from the drop-down
- Check whether Redirect 301 is working properly (it will throw an error if your redirect is not working). At least your home page must redirect to the new website, it suggests for canonical pages also but can ignore that for later.
- Check for verification methods
- Allow you to submit the change of address

Once done it will show you a message on the console “This site is currently moving to “new.com“, your new domain name.
Google may take approximately 6 months to change the address of your website, so it’s recommended that you renew or keep your old domain for at least a year to avoid any malicious use of your old domain.
Notify your social media channels about “new.com”
Finally, you need to publish your new website URL to all your social media channels and pages like Facebook, Twitter, Reddit and Youtube etc. You must replace the old URL with the new website URL, where-ever you have mentioned it.
Final Words
Transfer of WordPress site to a new domain may take a big heart to decide but doing that is easy. Technology has made things simple with plugins, scripts and automatic wizards.
I hope you will follow each and every step of this tutorial and will easily be able to transfer the WordPress site to a new domain on Bluehost without any hiccups.
If you really like my tutorial on “How to transfer WordPress site to new domain on Bluehost” and was able to migrate your website, Please leave your comments and feedback. Also share it with your friends who need it.
See you soon in the next post, Signing off for now ➡

