
This post will help you with steps on “How to install Zabbix on Rocky Linux” or AlmaLinux. The same steps will apply to CentOS 8 also. You just keep following all steps patiently and you will end up with the Zabbix 5.4 monitoring tool installed successfully on your server.
What is Zabbix
Zabbix is an open-source monitoring software tool created by Alexei Vladishev to monitor Networks, Servers, Virtual machines, Cloud services, Databases and many more IT components. Zabbix uses XML based template which contains elements to monitor. The backend of Zabbix is written in C programming and PHP is used for the web frontend.
So based on metrics and thresholds defined for your IT environment, Zabbix can send you alerts to notify the different events and issues. It supports agent-based and agentless monitoring. But Zabbix agents installation can help you to get detailed monitoring e.g. CPU load, network, disk space utilization etc. Zabbix 5.4 is the latest version available while writing this article.
Below mentioned are the high-level features of Zabbix –
- Metric collection
- Problem detection
- Alerting
- Data visualization and analyses
- Single pane of Glass for monitoring and management
- Integrations with all leading software and hardware vendors
- Security and auditing
- Ease of deployment
- Scalable solution
Zabbix is free of cost but commercial support is available, in case required.
Pre-requisites to install Zabbix in Rocky Linux or AlmaLinux
Zabbix requirement depends on the number of devices, you are going to monitor in your infrastructure. More computing resources results in the monitoring of more devices. Follow this guide to get a fair idea of the requirements.
- Minimum of 128 MB of memory
- 256 MB of free disk space to start with
- CPU, significant CPU resources are required depending upon number of monitored parameters and database engine. Checkout the table mentioned below.
- Support all the major operating system available like Linux, Solaris, Windows, macOS, FreeBSD etc.
- Root or sudo access user
Few sample hardware configurations of Zabbix to start with. You can check out more details on requirements here.
| Name | Platform | CPU/Memory | Database | Monitored hosts |
|---|---|---|---|---|
| Small | CentOS | Virtual Appliance | MySQL InnoDB | 100 |
| Medium | CentOS | 2 CPU cores/2GB | MySQL InnoDB | 500 |
| Large | RedHat Enterprise Linux | 4 CPU cores/8GB | RAID10 MySQL InnoDB or PostgreSQL | >1000 |
| Very large | RedHat Enterprise Linux | 8 CPU cores/16GB | Fast RAID10 MySQL InnoDB or PostgreSQL | >10000 |
How to install Zabbix on Rocky Linux or AlmaLinux
You can install Zabbix 5.4 using the following methods.
- Installation from sources
- Installation from packages
- Installation from containers
In this tutorial, I will show you how to install Zabbix on Linux using packages. If you are trying to install Zabbix on any of the following mentioned Linux distros, the steps are the same as shown in this post.
- Fedora
- CentOS, already announced dead, in case you are still using it.
- RedHat Enterprise Linux
- AlmaLinux
- Rocky Linux
I have Rocky Linux 8.5 installed on my VMware workstation lab. So I will use Rocky Linux as the operating system to install Zabbix. Follow along step by step –
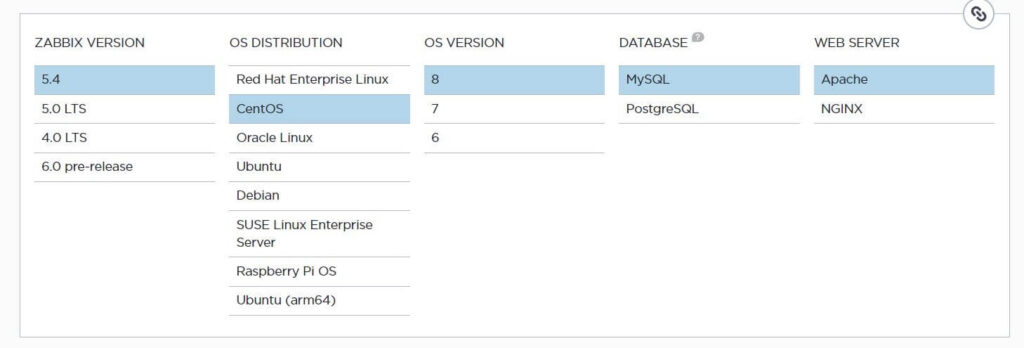
Step 0 – Choose your platform
As shown in this image, Before Zabbix installation, you need to choose your Zabbix version, OS Distro, OS version, Database and Web server type.
Although AlmaLinux and Rocky Linux are not mentioned currently in the list on the Zabbix site. But these are from the same family as CentOS 8. I hope soon Zabbix will include Rocky and AlmaLinux also in his documentation.
I will be using Apache, MySQL/MariaDB, Rocky Linux 8 for this tutorial.
Step 1 – Update your packages to install Zabbix on Rocky Linux/AlmaLinux
This may be one of the first steps if you have not updated your Rocky Linux for a long time, or you are interested in upgrading to the latest Rocky Linux version available in the repository.
I already have an updated package on Rocky Linux.
$ sudo dnf update -y
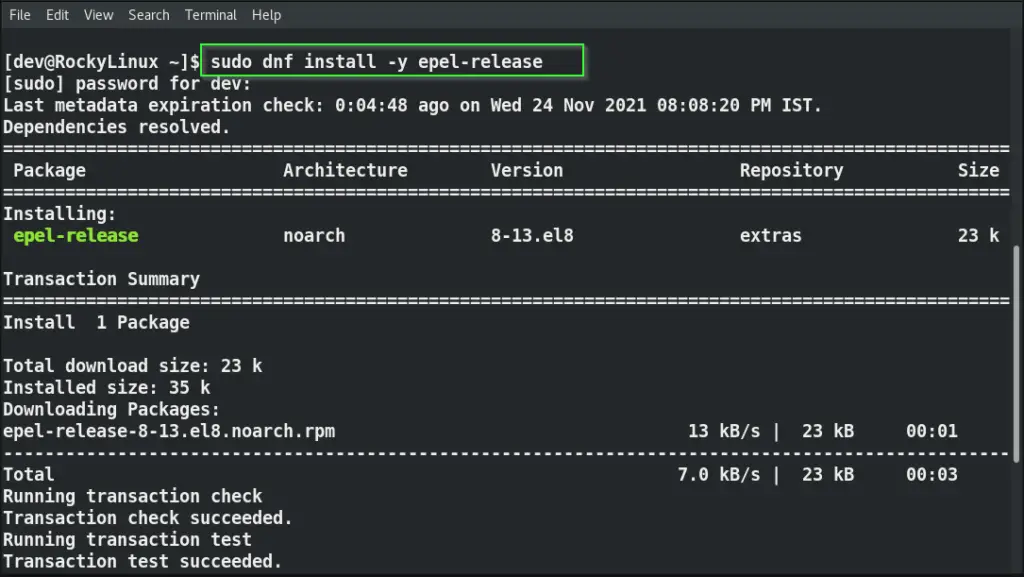
Let’s Install the “epel-release” package firsts that includes gpg keys for package signing and repository information. This package allows us to use normal tools such also like “yum” to install packages and their dependencies. But it’s an optional step.
$ sudo dnf install -y epel-release
Step 2 – Install Apache, PHP and supported extension for Zabbix
Now install Apache, PHP and its extension for Zabbix web frontend functionality using the following command. In command “httpd” is Apache webserver and PHP and supported libraries are self-understood with the name.
$ sudo dnf install -y httpd php php-mysqlnd php-ldap php-bcmath php-mbstring php-gd php-xml

Step 3 – Take backup and configure php.ini to run Zabbix server
Next, add/change the following values in the php.ini file to run the Zabbix server.
You can use nano or Vi editor to do it. Before doing any modification, take a backup of the php.ini file using the cp command.
For example, I have copied the original “php.ini” file to “php.ini.Orig”.
$ sudo cp /etc/php.ini /etc/php.ini.orig

I will use the vi editor to edit the php.ini file
$ sudo vi /etc/php.ini
Now press the “ESC” key and type /searchstring. where the string is the PHP value you need to change. For example, I will press “ESC” and /post_max_size to search and replace the value from 8M to 16M.
Refer to the image for a better understanding.

Repeat above mentioned procedure for all these PHP values, Just search and replace the values.
In PHP “;” sign means, the line is treated as a comment. So make sure you remove the “;” (semicolon) sign from “mbstring.func_overload” and “date.timezone” values.
Additionally, To give “date.timezone” values for your timezone, you can refer to this link. I have given my local date and timezone as Asia/Kolkata.
post_max_size = 16M
upload_max_filesize = 2M
max_execution_time 300
max_input_time = 300
memory_limit 128M
session.auto_start = 0
mbstring.func_overload = 0
date.timezone = Asia/Kolkata
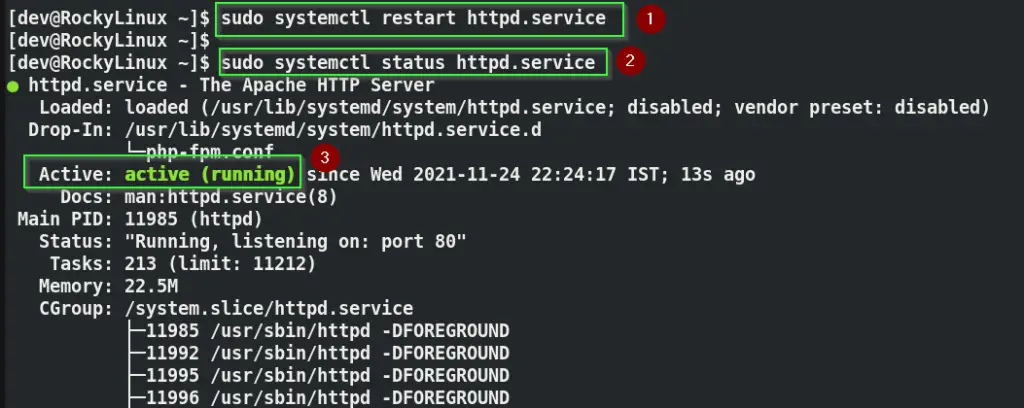
After changing the values, restart Apache services and check the status. The apache service must be in the active (running) state.
$ sudo systemctl restart httpd.service

$ sudo systemctl status httpd.service

$ systemctl enable httpd
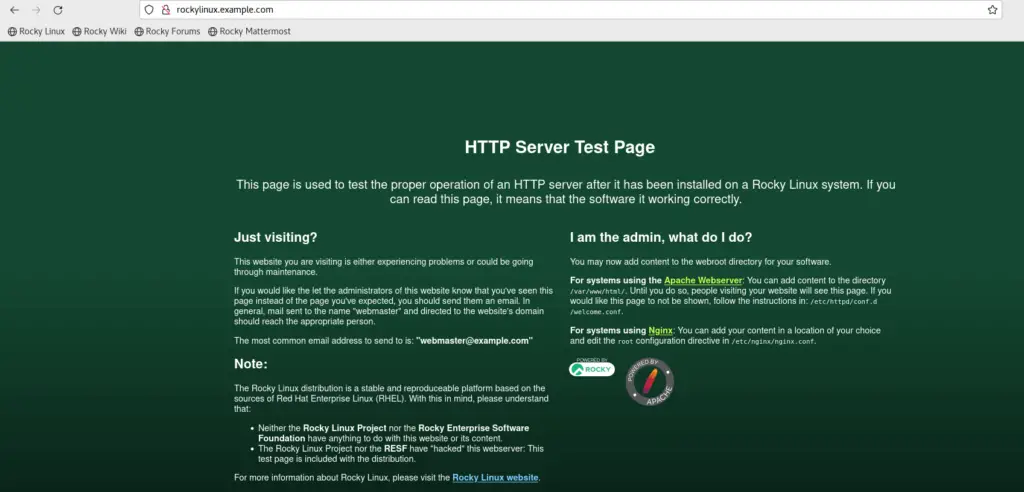
Step 4 – Validate Apache installation
Open a browser and type your “http://Server-Fully-qualified-domain-name” or “http://IP address“. You will be able to see the Apache test page. This confirms your apache is running successfully.
In my case, my hostname is “Rockylinux.example.com” and I am able to see the test page.
Tip – If you are getting issues, you can try disabling your internet connection and then try opening it offline. Also, check whether you can open it using http://localhost. If yes, then make sure you have hostname set for your Linux box and then you can ping it via name or IP.
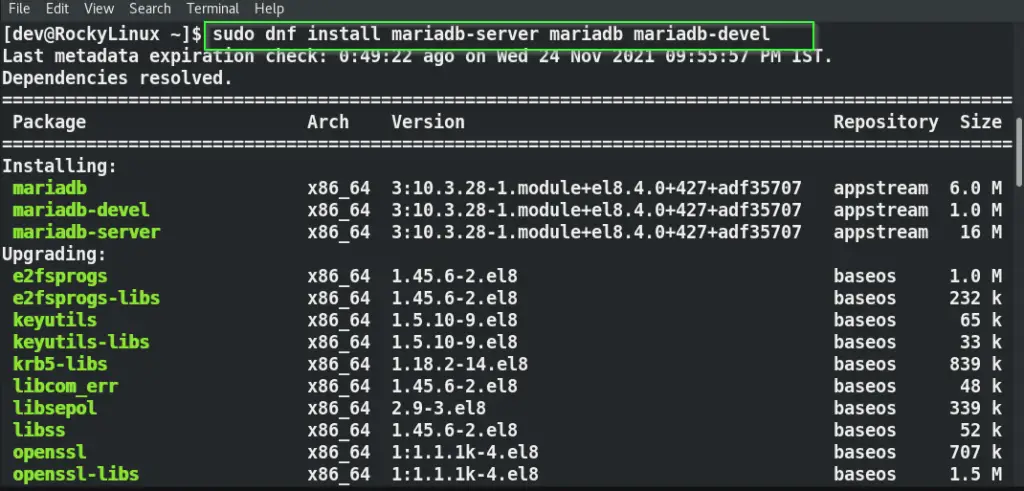
Step5- Install MariaDB Database and MYSQL development libraries required to install Zabbix server
The next step is to install the MariaDB database and MYSQL development libraries, which will be used as a backend database for Zabbix installation on Rocky Linux.
$ sudo dnf install -y mariadb-server mariadb mariadb-devel
Overview of packages installed –
- Mariadb-server – Mariadb database packagee
- Mariadb – Mariadb client
- Mariadb-devel – Mariadb developement package
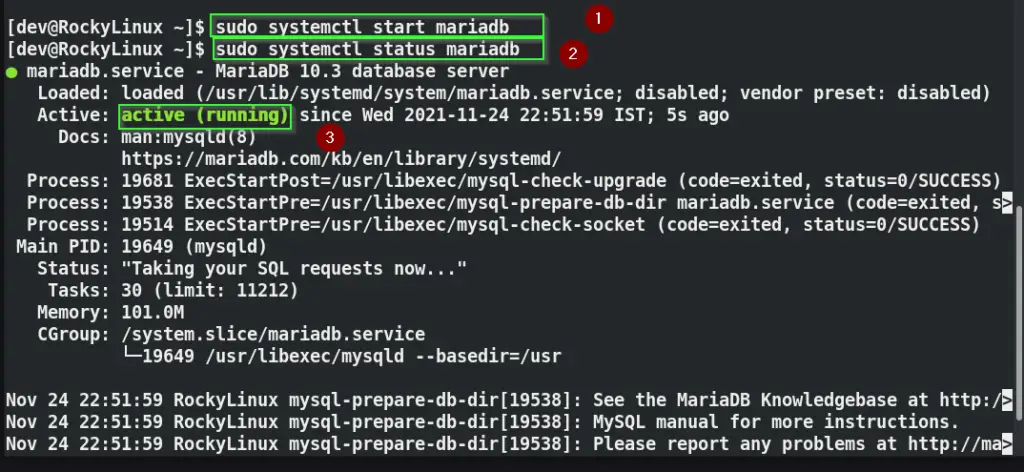
Once installation completes, start the MariaDB database service. Check status and service must be in the Active (running) state as shown in the image.
$ sudo systemctl start mariadb

$ sudo systemctl status mariadb

$ sudo systemctl enable mariadb
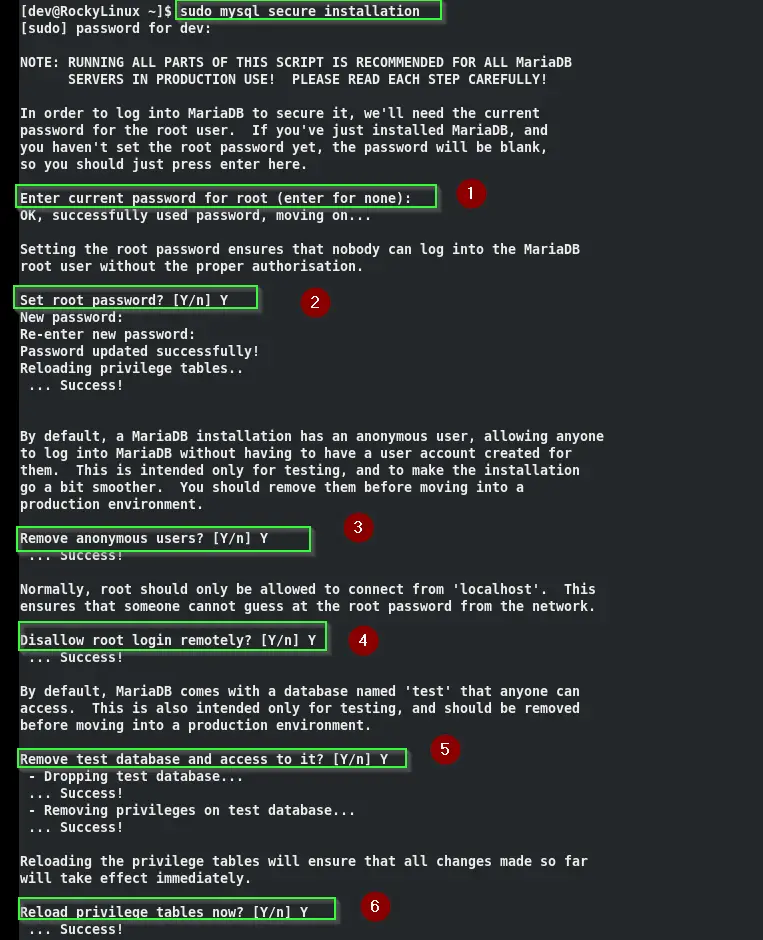
Step 6 – Secure Database using mysql_secure_installation
Now we need to secure our database. Run mysql_secure_installation command to secure MariaDB database and follow the wizard.
$ sudo mysql_secure_installation
Follow the below-mentioned steps during wizard to secure MariaDB-
- Press “Enter” for current root password, because we are installing MariaDB first time and root password is not yet set. By default MariaDB password for new installation is blank
- Press “Y” to set the root password of MariaDB and make a note of it. It will be required later to connect MariaDB.
- Press “Y” and then Enter to remove anonymous user
- Press “Y” to disallow root login remotely to your MariaDB
- To remove test database, enter “Y” as recommended
- Type “Y” to Reload privilege table
Check out the image for further reference.
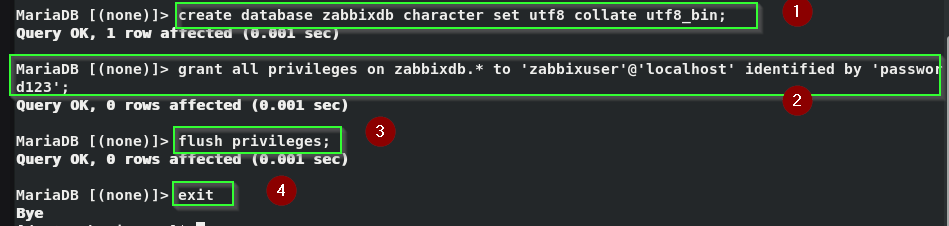
Step 7 – Create database for Zabbix and setup user/password and grant permission
- Connect to MariaDB with root password set up earlier in this post.
$ sudo mysql -u root -p
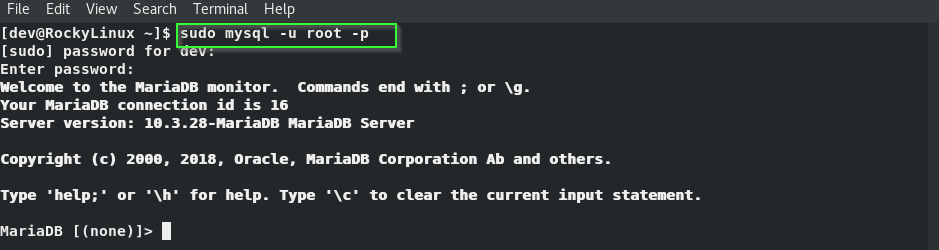
- Then create a database for the Zabbix monitoring tool. For example, I have given the name “zabbixdb” as the database name. You can give it as per your preference.
MariaDB [(none)]> create database zabbixdb character set utf8 collate utf8_bin;
- Setup Zabbix user and password and grant access on zabbixdb database created in last step. You can replace username and password as per your preference.
MariaDB [(none)]> grant all privileges on zabbixdb.* to 'zabbixuser'@'localhost' identified by 'password123';
- Run Flush privileges and exit from MariaDB prompt. Check out the image, for further reference.
MariaDB [(none)]> FLUSH PRIVILEGES;


MariaDB [(none)]> EXIT;
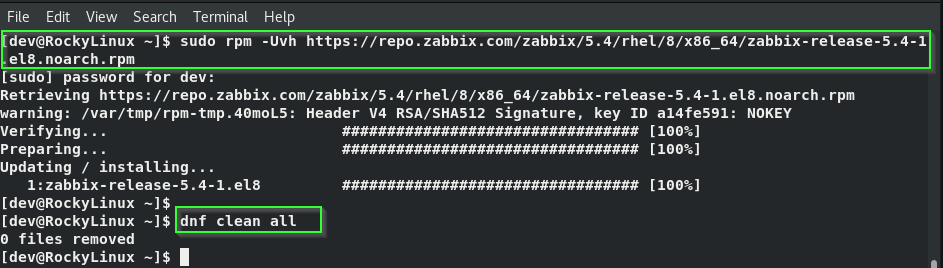
Step 8 – Configure Zabbix repository in your Rocky Linux/AlmaLinux
Add Zabbix repository to your distro, it will help to install the package directly from the Zabbix repository. Don’t forget to clean the cache files generated from repository metadata with the “dnf clean all” command.
$ sudo rpm -Uvh https://repo.zabbix.com/zabbix/5.4/rhel/8/x86_64/zabbix-release-5.4-1.el8.noarch.rpm

$ sudo dnf clean all
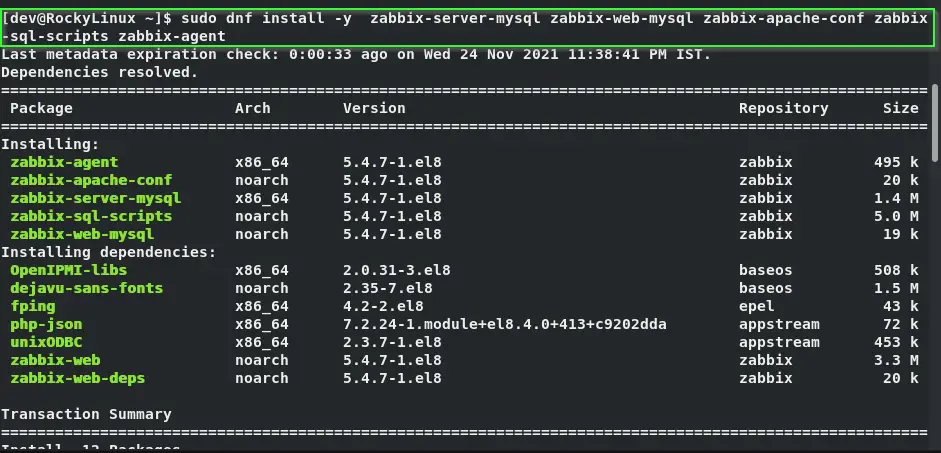
Step 9 – Install Zabbix server packages on Rocky Linux/AlmaLinux
Next, you need to install zabbix-agent, zabbix-apache-conf, zabbix-server-mysql, zabbix-sql-scripts and zabbix-web-mysql packages with required dependencies.
$ sudo dnf install -y zabbix-server-mysql zabbix-web-mysql zabbix-apache-conf zabbix-sql-scripts zabbix-agent
- Now restart the Apache (HTTP) server to apply the Zabbix configuration file installed for Apache in the last step.
$ sudo systemctl restart httpd
- Disable SELinux on your RockyLinux or AlmaLinux
$ sudo setenforce 0
Step 10 – Import Schema against the Zabbix database for Zabbix application
Import Schema against the database (Zabbixdb) created for the Zabbix application. Provide MYSQL root password, when prompted.
$ sudo zcat /usr/share/doc/zabbix-sql-scripts/mysql/create.sql.gz | mysql -u zabbixuser zabbixdb -p

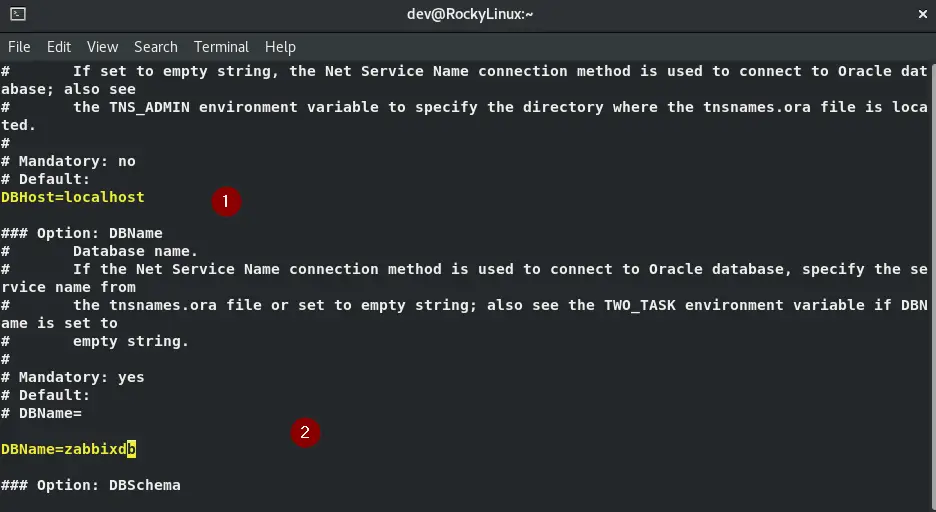
Step 11 – Configure Zabbix server config file to connect with database
Take a backup of the zabbix_server.conf file and edit it using your favourite editor. I will use vi editor.
$ sudo cp /etc/zabbix/zabbix_server.conf /etc/zabbix/zabbix_server.conf.orig

$ sudo vi /etc/zabbix/zabbix_server.conf

Search and replace the following variables with the values provided below. We are adding our DB entries to be used by Zabbix as backend DB.
Make sure you input the below-mentioned parameters (Or your own custom values) and remove “#” against each value and remove the white space, in case exist. Otherwise, variables will not be applicable and will be treated as comments. You may get an error connecting the Database.
DBHost=localhost
DBName=zabbixdb
DBUser=zabbixuser
DBPassword=password123
Check out the image with a sample on the right way to editing parameters.
Save the file with “:wq!” and exit in case of vi editor.
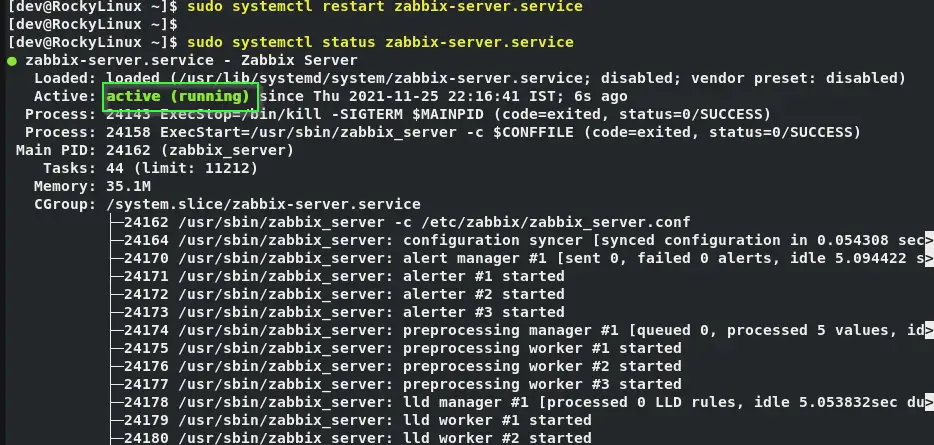
Restart Zabbix server and check status
$ sudo systemctl restart zabbix-server.service

$ sudo systemctl status zabbix-server.service

$ sudo systemctl enable zabbix-server
Step 12 – Configure Zabbix agent conf file to connect it with Zabbix server
Take a backup of the Zabbix agent configuration file and edit it.
$ sudo cp /etc/zabbix/zabbix_agentd.conf /etc/zabbix/zabbix_agentd.conf.orig

$ sudo vi /etc/zabbix/zabbix_agentd.conf

Just search and replace two lines in the zabbix_agentd.conf file of the Zabbix agent as provided. You are configuring your Zabbix server listening on default port 10050 in Zabbix monitoring. Remove the “#” sign against ListenPort in the file.
Server=127.0.0.1

ListenPort=10050
- The Zabbix server actually monitors itself using the Zabbix agent installed.
Save and exit from the Zabbix agent configuration file.
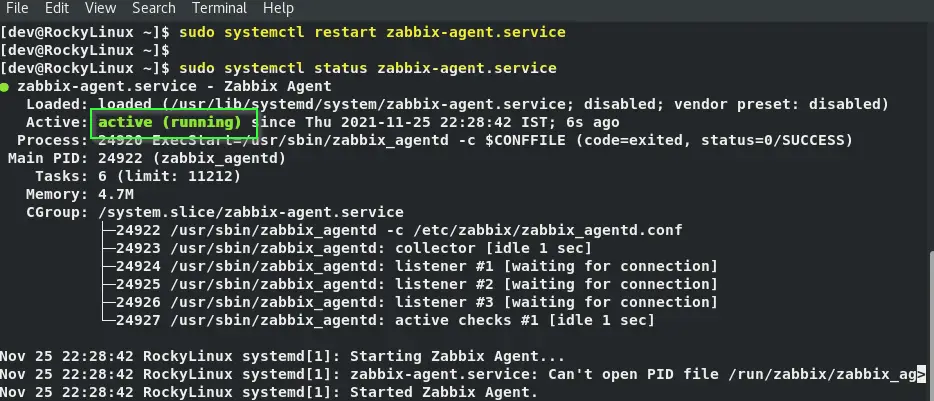
Restart Zabbix agent to implement changes and check status
The Zabbix agent service must be in running status after a restart.
$ sudo systemctl restart zabbix-agent.service

$ sudo systemctl status zabbix-agent.service

$ sudo systemctl enable zabbix-agent
Step 13 – Configure the Firewall Rules for Zabbix
If you use a firewall, then don’t forget to allow the below-mentioned Zabbix default ports. Which are required to connect the Zabbix server from any host running the Zabbix agent to add in monitoring.
$ sudo firewall-cmd --permanent --add-port=10050/tcp
$ sudo firewall-cmd --permanent --add-port=10051/tcp
$ sudo firewall-cmd --permanent --add-port=80/tcp
- Restart firewall
$ sudo firewall-cmd --reload
Step 14 – Install and configure Zabbix frontend interface using browser in Rocky Linux or AlmaLinux
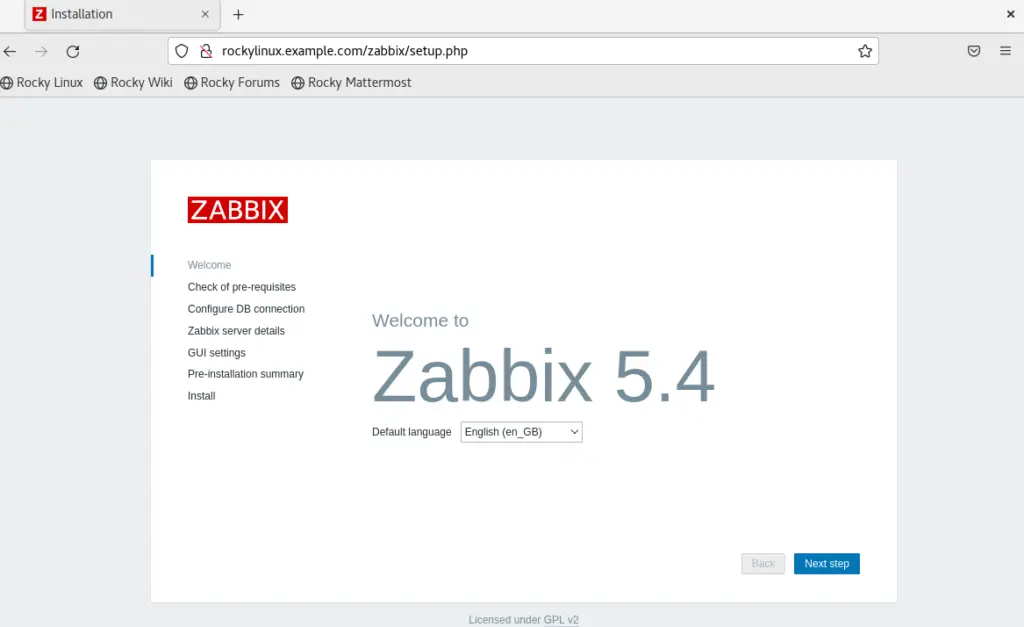
- Open http://Server-FQDN/zabbix/setup.php or http://Your-IP-Address/zabbix/setup.php to configure zabbix interface in browser.
For example, I am using http://rockylinux.example.com/zabbix/setup.php as shown in the image.
Select your “default language” and click “Next step” on the Welcome page
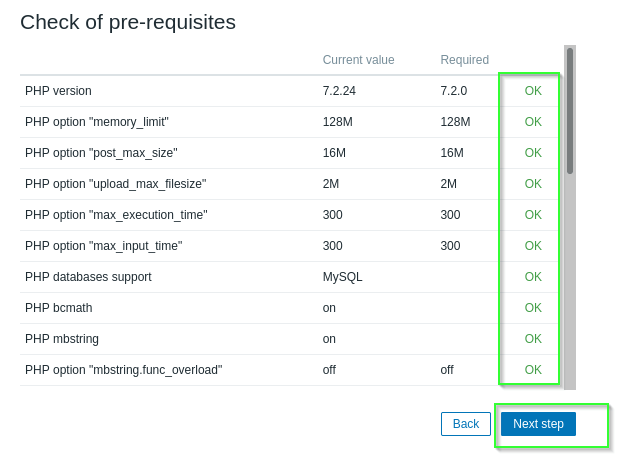
Check all pre-requisite shows “Ok” and click Next step
If you have followed the article step by step, you will not get any issues here.
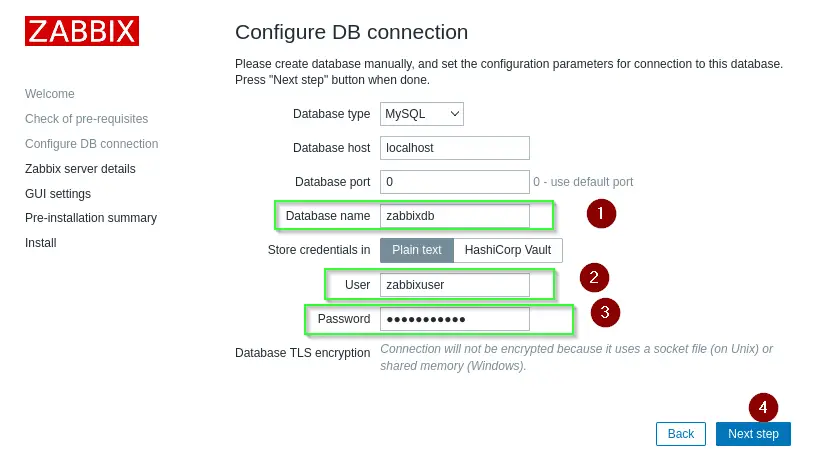
Configure Zabbix DB connection as shown in the image
Leave all other parameters default, Just provide values in the Database Name, User and Password, you have earlier in this tutorial.
Database name - zabbixdb
user - zabbixuser
password - password123
- Click Next Step.
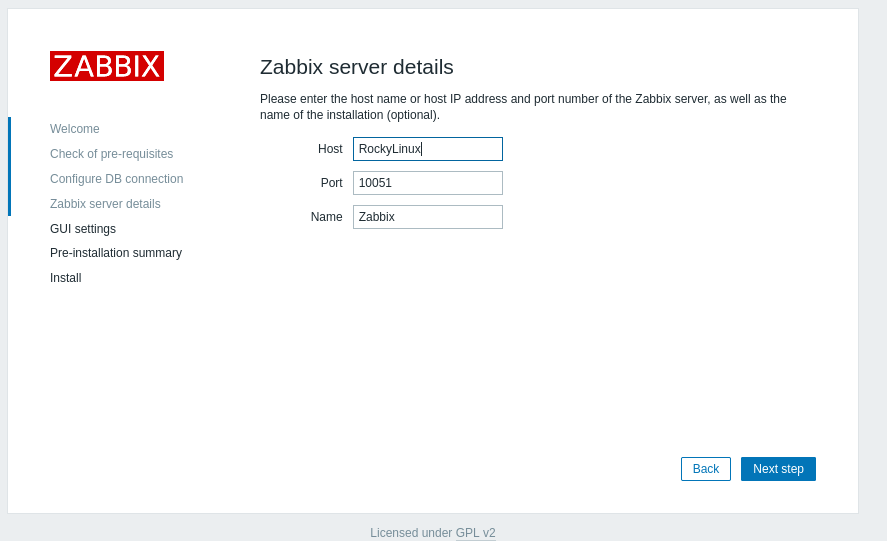
Provide Zabbix server details
I have given the hostname of my server, the port number is kept default and I have given the name of installation as Zabbix.
Click Next step
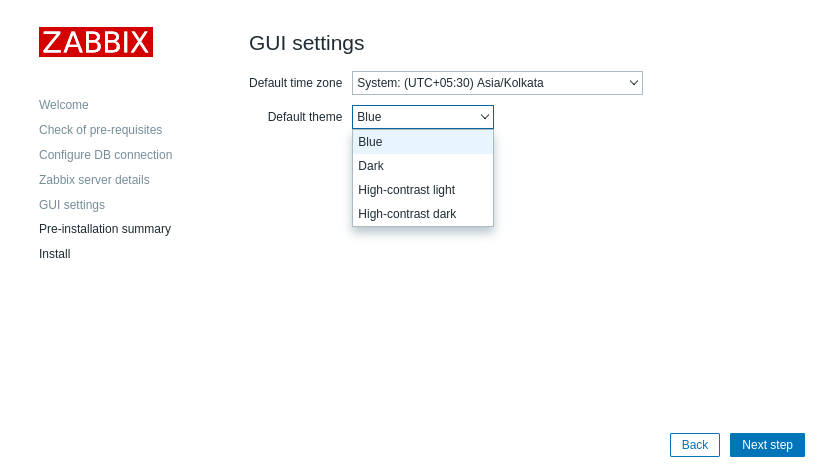
Select Zabbix gui setting on this page
You can change your timezone and theme as per your preference as shown in the image.
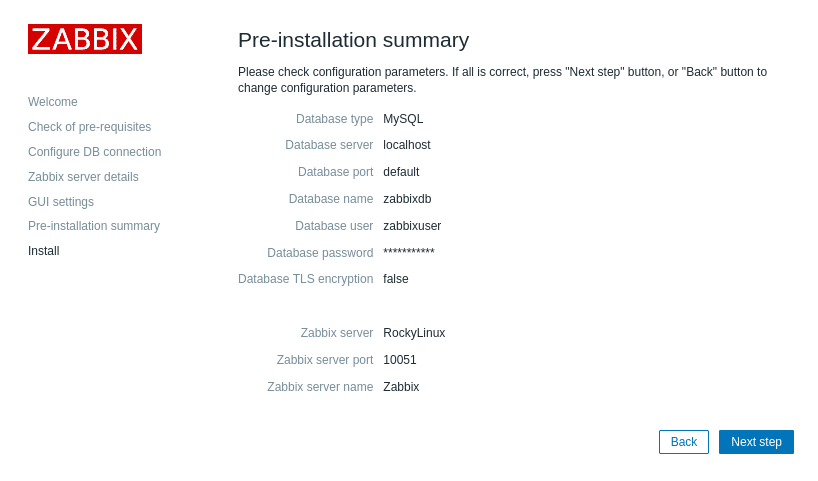
Take a look at the pre-installation summary and click Next step, if all looks Ok. You can go back and change settings if something is not correct.
You will get a message of a successful Zabbix front end configuration
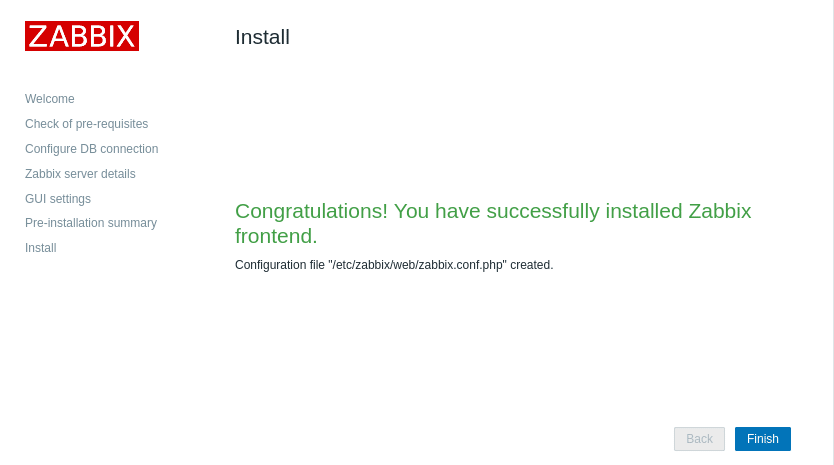
Click Finish.
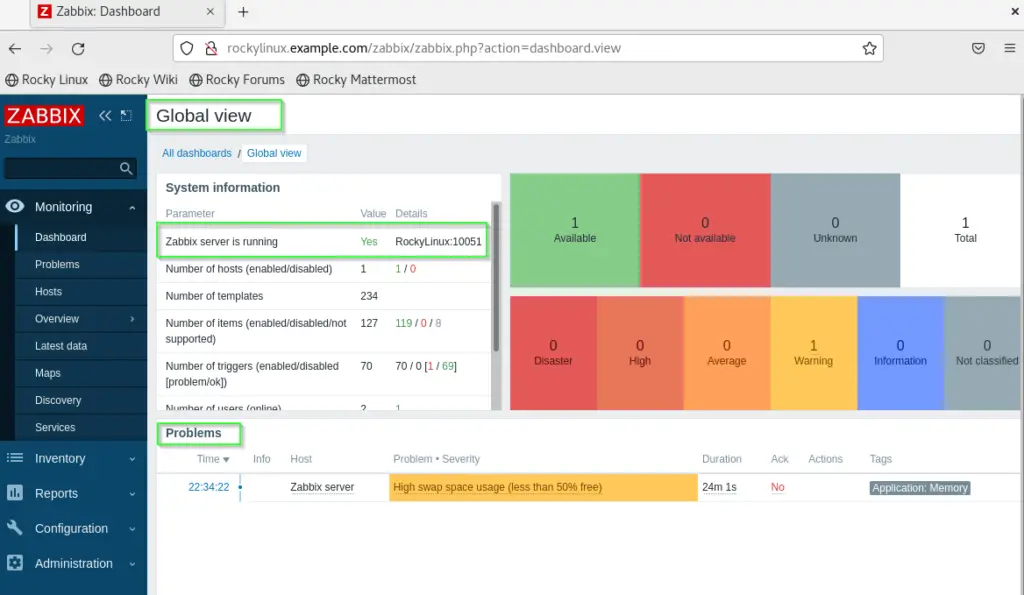
Step 15 – Login with default user Admin and Password
Open URL “http://server-fqdn/zabbix/index.php” or “http://IP-address/zabbix/index.php” to login and get the Zabbix admin dashboard.
URL - http://yourFQDN/zabbix/index.php

username - Admin                     #Username is case sensitive

Password - zabbix
You will get the Zabbix admin panel with a dashboard showing system information, Problems and all configuration options as shown in the image.
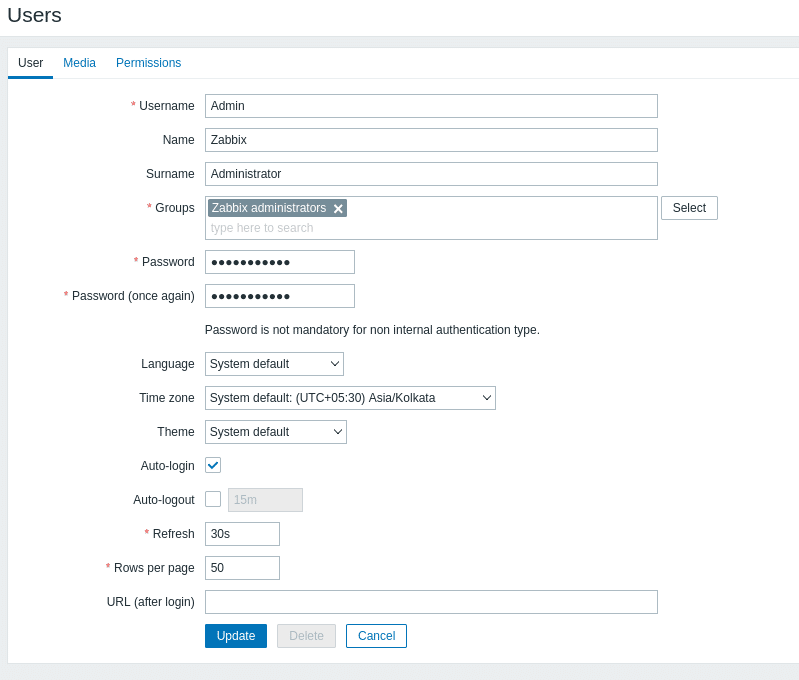
Change the zabbix’s default Admin password immediately to secure your Zabbix installation
- Go to Administration (left pane) and expand it using arrow key > Users
- Click on “Admin” username link
- Click on password
- Provide your new password twice and click update.
Congrats!! you have completed the installation of Zabbix on your Rocky Linux server.
Video Tutorial
Check out this video on “How to install Zabbix on Rocky Linux or AlmaLinux“, in case you find difficulty in executing commands.
Troubleshooting
How to fix zabbix_server [37606]: cannot initialize IPC services: Cannot access path /var/run/zabbix: [13] permission denied
If you are getting any error “failed to start Zabbix server” when you configured the Zabbix configuration file and restarted the Zabbix-server.service. Follow these steps to troubleshoot
1. Check the status of the Zabbix-server.service
$ sudo systemctl status zabbix-server.service
2. If it says “Failed to start Zabbix server“. Run the “journalctl” command to see details of the error
$ journalctl -xe
3. If the error details say “zabbix_server [37606]: cannot initialize IPC services: Cannot access path /var/run/Zabbix: [13] permission denied“.
4. Above mentioned error confirm you don’t have access to the /var/run/Zabbix directory. Change the permission from 755 to 777 and restart Zabbix-server.service again.
$ chmod -R 777 /var/run/zabbix
$ sudo systemctl restart zabbix-server.service
This will resolve the error and you will be able to move ahead with Zabbix installation.
How do i fix “zabbix-server.service: Can’t open PID file /run/zabbix/zabbix_server.pid (yet?) after start>” error?
To fix this error, follow these steps –
1. Edit /etc/zabbix/zabbix_server.conf file using your favourite editor
$ sudo vi /etc/zabbix/zabbix_server.conf
2. Change PID file location and enable /tm/zabbix_server.pid and disable “/var/run/zabbix/zabbix_server.pid” with placing # in front of statement.
PidFile=/tmp/zabbix_server.pid
#PidFile=/var/run/zabbix/zabbix_server.pid
3. Save file and exit
4. Now edit “/usr/lib/systemd/system/zabbix-server.service” file and go to [Service] section.
Provide the new location of PID file “/tmp/zabbix_server.pid” and disable /run/zabbix/zabbix_server.pid with placing # in front as shown below.
[Service]
Restart=on-failure
PIDFile=/tmp/zabbix_server.pid
#PIDFile=/run/zabbix/zabbix_server.pid
Restart service. It should work without issues now.
$ sudo systemctl restart zabbix-server.service
I am unable to log in with the default username admin in Zabbix
Username and password both are case sensitive in Zabbix. So make sure you type A uppercase in username “Admin”. and password “Zabbix”. All lower case.
How to fix error “database charset change from latin1 to utf8” in Zabbix
It is not an error, it actually informs your latin1 charset changed to utf8. If you are having any issues due to this and want to convert completely to utf8. The below-mentioned command may help.
mysql> ALTER DATABASE databasename CHARACTER SET utf8mb4 COLLATE utf8mb4_unicode_ci;
mysql> ALTER TABLE tablename CONVERT TO CHARACTER SET utf8mb4 COLLATE utf8mb4_unicode_ci;
How to fix “incorrect default charset for Zabbix database: “latin1” instead “UTF8”.
Run the following command on mysql command prompt.
mysql> ALTER DATABASE databasename CHARACTER SET utf8mb4 COLLATE utf8mb4_unicode_ci;
mysql> ALTER TABLE tablename CONVERT TO CHARACTER SET utf8mb4 COLLATE utf8mb4_unicode_ci;
End Note
I agree that the installation of Zabbix requires a bit of time. But I hope using this guide on “How to install Zabbix on Rocky Linux“, you would have installed it without any issue.
You can visit Zabbix documentation to read more on this amazing monitoring tool.
Let me know, in case you face any issues during Zabbix installation, I will help you to the best of my knowledge.

![How to fix the “Yum command not found” error in Linux [Update 2023]](https://cloudlinuxtech.com/wp-content/uploads/2022/04/How-to-Fix-Yum-command-not-found-error-270x161.png)
