
This post will help you to understand “What is terraform and How to install Terraform” in Windows 10. It will give you a little insight into this cloud agnostic tool. Even if you are a novice to terraform and want to learn it.
If you will follow along with this article, You will get an overview of infrastructure as code (IaC) and it’s benefits. Also, I will help you to install all the required tools to run your first Terraform IaC code. So stay tuned to launch your first EC2 instance using Terraform.
What is Infrastructure as Code (IaC)?
A machine and human-readable code to implement and manage infrastructures like Virtual machines, Networks, Load balancer and topologies. This code helps in versioning and implementing the same infrastructure every time using the DevOps technique (CI/CD pipelines). It’s very helpful to rebuild your complete infrastructure in a short time in the case of Disaster. In a nutshell, Infrastructure as Code manages large scale distributed systems, cloud applications and service-based architectures using codes.
Infrastructure as Code benefits :-
There are several benefits of Infrastructure as Code and below mentioned are a few important ones.
- Simple and immutable infrastructure – Infrastructure will be deployed using DevOps (CI/CD Pipelines). So uniformity can be ensured across complete process and infrastructure deployment.
- Configuration consistency – Standardization of the setup of infrastructure, which results in less or no human error. This reduces application compatibility issues and helps to run applications smoothly.
- Cost-saving – When everything is automated without any manual intervention. Companies can save cost by reducing people, who manage their infrastructure. Additionally, IaC scripts can save costs on cloud computing also.
- Minimum risk – No dependency on any Engineer or Infrastructure lead. You have human-readable code to set up and manage your infrastructure. So there is no risk if somebody leaves your organization. Anyone can manage infra from the first day by using SOPs (Standard operating procedures) and IaC codes.
- Fast deployment – Implement your complete infrastructure fast using codes (in case of disaster). Reduced RPO (Recovery point objective) and RTO (Recovery time objective).
- Easy Change management – Code versioning helps to configure exact changes need to implement in infra. This also results in quick bug fixing and ensures the security & quality of codes.
Infrastructure as code example :-
Check out this simple terraform EC2 instance launch code for AWS . It’s in easy human and machine readable format.
In this example, provider is AWS and region is us-east-1. VM instance name is LinuxVM, AMI and instance type defined.
provider "aws" {
  region = "us-east-1"
}
resource "aws_instance" "LinuxVM" {
  ami = "ami-047a51fa27710816e"
  instance_type = "t2.micro"
}
What is Terraform and it’s uses
There are many tools to implement infrastructure as code like Ansible, CloudFormation, Azure Resource Manager, Chef, Google cloud deployment manager and more. Terraform is one of the powerful tools (by HashiCorp) that belong to this list. It helps to build, change and manage your infrastructure easily with versioning manifest. Every cloud vendor has its own IaC tool, but Terraform is cloud-agnostic. So you can use a single tool to manage your multi-cloud environment.
How to setup Terraform in Windows 10 completely
Requirement to setup Terraform and write Infrastructure as Code –
- Visual studio code editor
- Visual code extensions to support Terraform
- Terraform tool
- AWS account
- AWS CLI V2
Let’s install and configure all above mentioned tools one by one –
How to Install Microsoft Visual studio code in Windows 10
To code using Terraform, You need a good editor. Visual studio code is free and one of the lightweight feature-rich editor. It is available for Windows, Linux and macOS. The functionality of VSC can be increased by installing several third party extension to help you in coding.
Step1- Download latest visual studio code editor
Visit “https://code.visualstudio.com/” and download visual studio code editor for Windows 7,8, 10. You have options to download user installer, system installer and zip files for 64-bit, 32-bit or ARM architecture.
Alternatively, Click on “Download” button to get visual studio code editor.

Step2- Install Microsoft Visual studio code
Follow these steps to install Microsoft VSC in Windows 10 –
Step2.1- Go to your Download Folder and Run installer
Browse to your download folder and double click on file “VSCodeUserSetup-x64-1.53.2“.

Step2.2- Accept EULA
Accept EULA “End User license Agreement” and click Next.

Step2.3- Select destination Location to install Visual studio code
On this screen, you can provide the destination folder to install the VSC editor. I will leave it default. You will need around 259.7 MB of free space on the disk to install Visual studio code excluding extensions.

Step2.4- Set up Program Shortcuts in Start Menu.
Click Next on “Select start menu folder screen“.

Step2.5- Select additional tasks as per your preference
I would recommend you to select at least theses two options from the provided additional tasks list. Others are optional and depends on your choice.
- Create a desktop icon – It will create a visual studio code shortcut at your desktop
- Add to PATH – Setup Visual studio code environment variable.
Click Next.

Step2.6- Install Visual studio code editor
Click on Install. It will take few mins to install Visual code editor in your Windows 10 system.

Step2.7- Finish and Launch Visual studio code

Step3- Visual code extensions to support Terraform
Once you are done with Visual code editor installation. Now you need to create a folder as the default location for VSC files. Also, you would need to install Terraform’s extension to help in coding. There are many extensions, but below must be installed in my view –
- HashiCorp Terraform – Helps in syntax highlighting and auto-completion
- Terraform Autocomplete – This post will help you to set up terraform for AWS. So this extension will help you to autocomplete AWS resources.
Follow theses steps to install extensions –
- Click on “Extensions button” or Press <Ctrl + Shift + X> on your keyboard.
- Type Terraform to list down all terraform extensions.
- Click “Install” to install the above-mentioned extensions.
Refer to this image to understand better –

Till this point, we are done with Visual code editor setup for Terraform. Now let’s setup Terraform.
How to Install Terraform in Windows 10
Terraform is fairly easy to install. Follow these step by step instructions to install Terraform in Windows 10.
Step4- Download Terraform
Visit “https://www.terraform.io/downloads.html” website and download your terraform 0.14 for Windows 10 64-bit.
OR
Click Download button

Step5 – Install Terraform version 0.14 in Windows 10
You just need to extract your terraform zip file and setup environment variable. Follow these steps to install terraform.
Step5.1- Visit your Download location and extract Terraform zip file
- Visit your Download directory and Right-click on your “terraform_0.14.7_windows_amd64“.zip file and select “Extract all“.
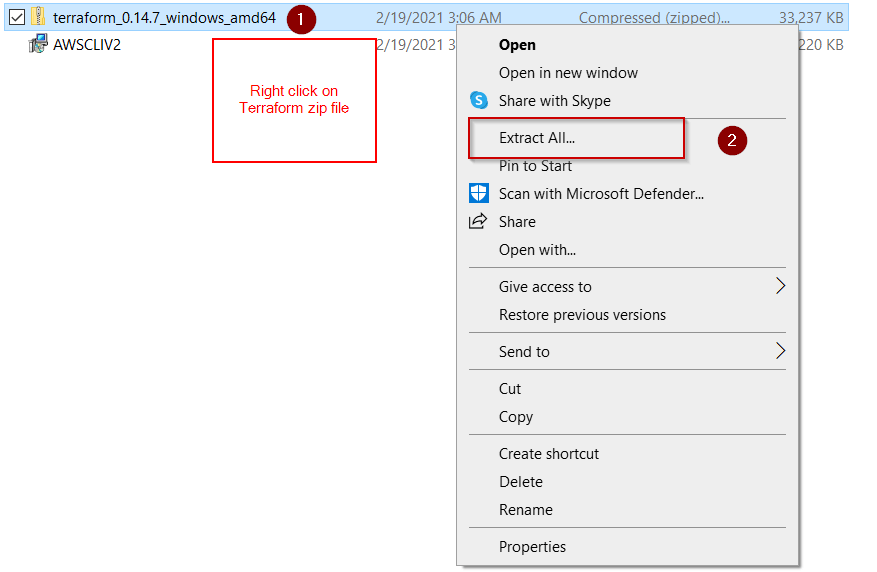
- Browse to your data drive or folder, where you want to extract it. I will select C: drive and terraform_0.14.7_windows_amd64 folder.

- Click “Extract“. It will create “terraform_0.14.7_windows_amd64” in C:\ drive. For example, My Terraform installation location is “C:\terraform_0.14.7_windows_amd64” and yours may be different. Just make a note of this installation path. It will be used to set up the “Terraform PATH” variable.
Step5.2- Setup Environment “PATH” variable for Terraform
Step5.2.1– Type “environment variable” in search box and click open.

Step5.2.2– Click on “Environment variables” in Advanced tab of System properties.

Step5.2.3 – Select “Path” and then click Edit.

Step5.2.4 – Click New > Add terraform variable path “C:\terraform_0.14.7_windows_amd64” > Click OK.
*** Please make a note, you need to replace the default “C:\terraform_0.14.7_windows_amd64” with your custom target Folder. In case you have selected a different folder to install Terraform.

Click OK twice to close all open dialogue boxes.
Step5.2.4 – Validate and check Terraform version.
Open command prompt {CMD} and run Terraform –version command.
C:\> terraform --version

Congrats!! your are done with Terraform installation.
Check out this post on How to create an Azure Virtual machine using Custom data in Terraform
How to set up a Free AWS account
The purpose of this tutorial is to teach you, “how to set up terraform for AWS“. So you would need an AWS account to run your first program using terraform. If you have an AWS account already, you can skip this step.
Step6- Signup for an AWS account
You can visit the AWS site and can signup for a free account. I have written a detailed article on “How to create AWS free account” and create your first EC2 instance. Just follow this article and create your first free AWS account and come back for the next steps.
How to install AWS CLI in Windows 10
Now the final nail in coffin is to install AWS CLI (command line interface) in your Windows 10 machine.
Step7 – Install AWS CLI in Windows 10
Follow these simple steps to download and install AWS CLI –
Step7.1 – Download AWS cli V2
Visit https://aws.amazon.com/cli/ website and download AWS cli V2 64-bit. Alternatively, click on download button to get it.

Step7.2 – Run AWS CLI installer
Visit your Download directory and <Double click> on “AWSCLIV2″ installer.

Step7.3 – Click Next on Welcome screen

Step7.4 – Accept AWS End User License Agreement and click Next

Step7.5 – Click Next on Features screen
By default all features of AWS CLI will be installed and will take 97 MB space on your disk. So keep it default and click “Next”.

Step7.6 – Select “Install” to start AWS CLI V2 installation on Windows 10

Step7.7 – Click Finish to complete setup

Step8- Configure AWS account
Let’s connect our AWS account, it is a pre-requisite for further steps. Follow these simple steps –
Step8.1- Sign into AWS portal and get your IAM credential key
- Login to AWS portal and got to IAM services.
- Click on “Users” and Select your user
- Click on the “Security credentials” tab and create an access key. If you have an access key already, you can skip this step.

4. Download and open .CSV file
Make a note of access key and secret access key. It will be required to allow AWS access from AWS CLI.

Step8.2- Connect your AWS account using AWS configure
Open PowerShell as administrator in Windows 10

Step8.3- Run “AWS configure” command and provide your credentials
Run command AWS configure in PowerShell and enter information from your “.CSV” file downloaded in Step 8.1. I have left these fields blank intentionally. I have provided comments against each field and highlighted them to make it more clear for you.
PS C:\Windows\system32> AWS configure
output
AWS Access Key ID [None]: "Copy and paste from .CSV file"
AWS Secret Access Key [None]: "Copy and paste from .CSV file"
Default region name [None]: "Set your region name, for example "us-east-1".
Default output format [None]: "Hit Enter, JSON is default format"

If you have reached till this step, then you are ready to run your first infrastructure as code in Terraform. Let’s deep dive in further into it.
How to Create your first EC2 instance using Terraform in AWS
Follow this step by step guide to create your first AWS EC2 instance –
Step9- Create EC2 instance using Terraform tool with default configuration
There are a lot of parameters, while you create an EC2 instance. This tutorial will cover the T2.micro instance with Amazon Linux2 AMI available in the free tier. I will keep all other options default in the code. This example is just to give you an idea on “how to run Terraform code”
Step9.1- Open Visual studio code editor and set default folder
- Open Visual studio code editor > Click on Files icon.
- Select Open folder tab
- Set up “Default folder” as per your choice. For example, I have set up “C:\Terraform” to keep my code files.
- Click on “Select Folder“
Check out below mentioned image for your reference.

Step9.2- Create a new code file and save it as “main.tf“
- Click on File > New file and then save as “main.tf“

Step9.3- Type code to create your first EC2 instance
This is the basic code for creating your first EC2 instance. All the highlighted parameters (orange colour) can be changed as per your wish.
Copy this code and paste it to your main.tf file.
provider "aws" {
  region = "us-east-1"
}
resource "aws_instance" "LinuxVM" {
  ami = "ami-047a51fa27710816e"
  instance_type = "t2.micro"
}

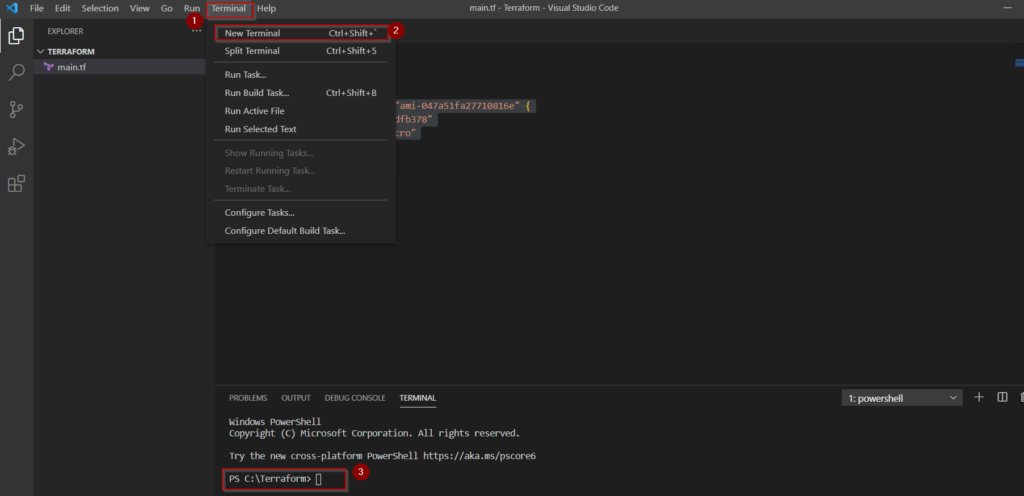
Step9.4- Run your first terraform code
To run this Terraform code, Click on Terminal > New Terminal > Make sure you are in right folder. For example, “C:\Terraform” in my case.
Step9.5- Run Terraform init
Terraform init command will initialize and install provider plugins (AWS in this case). It will also create a “.terraform.lock.hcl” lock file for this AWS provider to keep the state intact.
PS C:\Terraform> terraform init

Step9.6- Run Terraform validate
Terraform validate command helps to make sure “Code syntax” is correct.
PS C:\Terraform> terraform validate
--Output---
Success! The configuration is valid.

Step9.7- Execute Terraform Plan
Terraform Plan command is used to create an execution plan. This command easily checks whether the execution plan for a set of changes matches your expectations without making any changes to real resources or to the state.
PS C:\Terraform> terraform plan

If you are getting below mentioned credential error, please check whether you have provided right credentials in Step 8.3
Error : error configuring Terraform AWS Provider: no valid credential sources for Terraform AWS provider found.
Please see https://registry.terraform.io/providers/hashicorp/aws
for more information about providing credentials.
Error: NoCredentialProviders: No valid providers in chain. Deprecated.
For Verbose messaging see aws.Config.CredentialsChainVerboseErrors.

Step9.8- Run Terraform apply
This “Terraform apply” command will create resources in AWS as mentioned in the code. For example, an Amazon Linux2 with t2.micro type will be created in our case. Provide “yes” to accept and approve of this action.
PS C:\Terraform> terraform apply
Output –
 An execution plan has been generated and is shown below.
 Resource actions are indicated with the following symbols:
 create
 Terraform will perform the following actions:
 # aws_instance.ami-047a51fa27710816e will be created
 resource "aws_instance" "ami-047a51fa27710816e" {
 ami                          = "ami-02642c139a9dfb378"
 arn                          = (known after apply)
 associate_public_ip_address  = (known after apply)
 availability_zone            = (known after apply)
 cpu_core_count               = (known after apply)
 cpu_threads_per_core         = (known after apply)
 get_password_data            = false
 host_id                      = (known after apply)
 id                           = (known after apply)
 instance_state               = (known after apply)
 instance_type                = "t2.micro"
 ipv6_address_count           = (known after apply)
 ipv6_addresses               = (known after apply)
 key_name                     = (known after apply)
 outpost_arn                  = (known after apply)
 password_data                = (known after apply)
 placement_group              = (known after apply)
 primary_network_interface_id = (known after apply)
 private_dns                  = (known after apply)
 private_ip                   = (known after apply)
 public_dns                   = (known after apply)
 public_ip                    = (known after apply)
 secondary_private_ips        = (known after apply)
 security_groups              = (known after apply)
 source_dest_check            = true
 subnet_id                    = (known after apply)
 tenancy                      = (known after apply)
 vpc_security_group_ids       = (known after apply)
 ebs_block_device {
 delete_on_termination = (known after apply)
 device_name           = (known after apply)
 encrypted             = (known after apply)
 iops                  = (known after apply)
 kms_key_id            = (known after apply)
 snapshot_id           = (known after apply)
 tags                  = (known after apply)
 throughput            = (known after apply)
 volume_id             = (known after apply)
 volume_size           = (known after apply)
 volume_type           = (known after apply)
 }
 enclave_options {
 enabled = (known after apply)
 }
 ephemeral_block_device {
 device_name  = (known after apply)
 no_device    = (known after apply)
 virtual_name = (known after apply)
 }
 metadata_options {
 http_endpoint               = (known after apply)
 http_put_response_hop_limit = (known after apply)
 http_tokens                 = (known after apply)
 }
 network_interface {
 delete_on_termination = (known after apply)
 device_index          = (known after apply)
 network_interface_id  = (known after apply)
 }
 root_block_device {
 delete_on_termination = (known after apply)
 device_name           = (known after apply)
 encrypted             = (known after apply)
 iops                  = (known after apply)
 kms_key_id            = (known after apply)
 tags                  = (known after apply)
 throughput            = (known after apply)
 volume_id             = (known after apply)
 volume_size           = (known after apply)
 volume_type           = (known after apply)
 }
 }
 Plan: 1 to add, 0 to change, 0 to destroy.
 Do you want to perform these actions?
   Terraform will perform the actions described above.
   Only 'yes' will be accepted to approve.
 Enter a value: yes
 aws_instance.ami-047a51fa27710816e: Creating…
 aws_instance.ami-047a51fa27710816e: Still creating… [10s elapsed]
 aws_instance.ami-047a51fa27710816e: Still creating… [20s elapsed]
 aws_instance.ami-047a51fa27710816e: Still creating… [30s elapsed]
 aws_instance.ami-047a51fa27710816e: Creation complete after 37s [id=i-0b799bcd7262e8461]
 Apply complete! Resources: 1 added, 0 changed, 0 destroyed.
 PS C:\Terraform>

- Validate your EC2 instance in AWS console

Step9.9- Run Terraform destroy (optional)
Execute the “Terraform Destroy” command to delete your EC2 instance. This step is optional and can be run to clean up your AWS subscription. Type “yes” to approve destroy the resource.
*** Always run “Terraform Destroy” command with extreme caution in your environment.
PS C:\Terraform> terraform destroy
Output
An execution plan has been generated and is shown below.
 Resource actions are indicated with the following symbols:
 destroy
 Terraform will perform the following actions:
 # aws_instance.ami-047a51fa27710816e will be destroyed
 resource "aws_instance" "ami-047a51fa27710816e" {
 ami                          = "ami-02642c139a9dfb378" -> null
 arn                          = "arn:aws:ec2:us-east-1:465385365572:instance/i-0b799bcd7262e8461" -> null
 associate_public_ip_address  = true -> null
 availability_zone            = "us-east-1e" -> null
 cpu_core_count               = 1 -> null
 cpu_threads_per_core         = 1 -> null
 disable_api_termination      = false -> null
 ebs_optimized                = false -> null
 get_password_data            = false -> null
 hibernation                  = false -> null
 id                           = "i-0b799bcd7262e8461" -> null
 instance_state               = "running" -> null
 instance_type                = "t2.micro" -> null
 ipv6_address_count           = 0 -> null
 ipv6_addresses               = [] -> null
 monitoring                   = false -> null
 primary_network_interface_id = "eni-02015d805f66632b3" -> null
 private_dns                  = "ip-172-31-63-104.ec2.internal" -> null
 private_ip                   = "172.31.63.104" -> null
 public_dns                   = "ec2-52-3-245-109.compute-1.amazonaws.com" -> null
 public_ip                    = "52.3.245.109" -> null
 secondary_private_ips        = [] -> null
 security_groups              = [
 "default",
 ] -> null
 source_dest_check            = true -> null
 subnet_id                    = "subnet-368a2b07" -> null
 tenancy                      = "default" -> null
 vpc_security_group_ids       = [
 "sg-1fff0312",
 ] -> null
 credit_specification {
 cpu_credits = "standard" -> null
 }
 enclave_options {
 enabled = false -> null
 }
 metadata_options {
 http_endpoint               = "enabled" -> null
 http_put_response_hop_limit = 1 -> null
 http_tokens                 = "optional" -> null
 }
 root_block_device {
 delete_on_termination = true -> null
 device_name           = "/dev/sda1" -> null
 encrypted             = false -> null
 iops                  = 100 -> null
 tags                  = {} -> null
 throughput            = 0 -> null
 volume_id             = "vol-0ff2a563a38faf437" -> null
 volume_size           = 30 -> null
 volume_type           = "gp2" -> null
 }
 }
 Plan: 0 to add, 0 to change, 1 to destroy.
 Do you really want to destroy all resources?
   Terraform will destroy all your managed infrastructure, as shown above.
   There is no undo. Only 'yes' will be accepted to confirm.
 Enter a value: yes
 aws_instance.ami-047a51fa27710816e: Destroying… [id=i-0b799bcd7262e8461]
 aws_instance.ami-047a51fa27710816e: Still destroying… [id=i-0b799bcd7262e8461, 10s elapsed]
 aws_instance.ami-047a51fa27710816e: Still destroying… [id=i-0b799bcd7262e8461, 20s elapsed]
 aws_instance.ami-047a51fa27710816e: Still destroying… [id=i-0b799bcd7262e8461, 30s elapsed]
 aws_instance.ami-047a51fa27710816e: Destruction complete after 39s
 Destroy complete! Resources: 1 destroyed.
Video tutorial
If you hate reading and like watching video contents. Check out this video on how to install Terraform in Windows 10 with all the necessary tools to launch EC2 instance in AWS.
Conclusion
I hope you enjoyed this article on “How to install Terraform 0.14 in Windows 10” and able to launch your first EC2 instance using Terraform. Also, you would be having a fair idea of Infrastructure as Code (IaC).
What is your favourite IaC tool? Let me know through your comments.
![3 Steps to Deploy Terraform Azure VM Custom Data example [Infrastructure as code]](https://cloudlinuxtech.com/wp-content/uploads/2022/08/Terraform-Azure-VM-Custom-Data-example-270x161.png)