
If you are a developer either pro or novice and getting “Pip command not found error“. You have landed on the right page to find the solution. Majorly the reason is either you have not installed pip or the environment variable of pip is not set correctly. Based on the operating system, look for step by step solution to fix your pip command error.
What are the common errors, related to pip?
Below mentioned are very common errors you may encounter while working with Python and based on your operating system.
- Bash: pip: command not found
- Sudo pip command not found in Ubuntu
- Pip command not found in mac
- ‘pip’ is not recognized as an internal or external command, operable program or batch file
- pip command not found in Windows
- pyenv pip command not found
- pip command not found mac python 3
- zsh: command not found: pip
What are the quick fixes for “pip command not found error”?
- Check for the existing installation of Python and pip versions in your system. Also, try the pip3 command instead of the pip
- If pip is not installed, then install pip in the right way
- If pip is installed, then make sure you have Path or environment variable set up correctly
- Validate whether you are running python2 or python3 code and select your pip version accordingly. The recommendation is to move the codebase to Python and pip3 as Python2 is obsolete now.
- Reinstall or upgrade Python and pip both, in case still getting pip command not found error
- Exit out of the root user and run the pip command
What are Python and pip?
Python is a simple, Object-oriented, interpreted, high-level programming language with dynamic semantics. Due to its non-complicated syntax and fast edit-test-debug cycle, the Programmer community loves it. Python also reduces the cost of software management due to its simple nature. Python2 and Python3 are the two versions available, while Python2 is already obsolete and it’s suggested to move your codebase to Python3.
Pip is a package manager for python, it allows you to install and manage additional libraries and dependencies that are not distributed or part of the standard library.
*** For Windows10 and macOS, pip gets installed automatically with python3 as an option is available during installation. But in the case of Linux, you need to install pip3 after python3 installation separately.
How to fix pip command not found error in Ubuntu Linux
If you are getting “bash: pip command not found error” in Ubuntu or any other Linux distro. You can fix it easily by following methods –
Solution 1- Check Whether Python and Pip are installed already or not?
I will take Ubuntu as a Linux distro for this post –
1.1 – Open Terminal in Ubuntu
Press <Ctrl + Alt + t> on your keyboard to open terminal.
1.2 – Check for the Python version installed in your Linux system
- For python2. Python 2 is obsolete and it is recommended to move your codebase to python3.
$ python --version
- For Python3 which is by default installed in Ubuntu 20.04 or Ubuntu 21.04. In all new Linux distros, you get Python installed by default.
$ python3 --version

In my case, Python 3.8.5 is installed by default. Visit my other article if you want to install the latest python and pip in Ubuntu Linux.
1.3 – Check for the existing pip version in Ubuntu 21.04
Run pip –version command to check, whether pip is also installed. Try running both commands, generally pip3 works in most cases.
$ pip --version
OR
$ pip3 --version
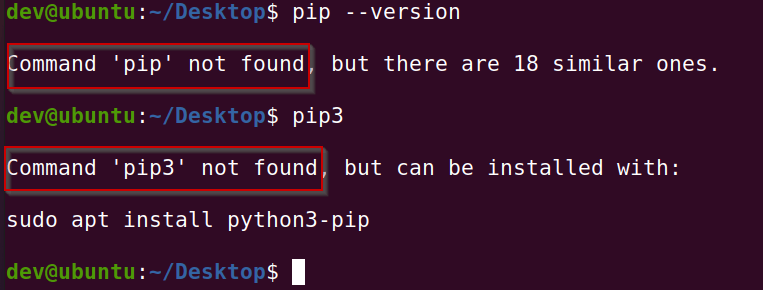
As you can see, I have got command ‘pip’ not found error. Because I have python 3 installed by default but not pip. So in Ubuntu make sure you always install pip as it’s not available by default.
- To install pip you can simply run –
$ sudo apt update

$ sudo apt install python3-venv python3-pip
Check out this post, in case you get the sudo: command not found error. Once you are done with the installation, check the pip version again. Now you will not get the “pip command not found error” as it has been fixed already.
For alternate pip installation methods, you can refer to this official guide also.
1.4 (Optional) – Setup alias of pip3 as pip if required
In the case of Linux, you get pip and pip3 commands both after installing Python and Pip. If this is not the case, creating an alias is the only solution.
Add the following alias in $HOME/.bash_aliases in some cases, files may be hidden. You can also create it, in the case file doesn’t exist. Here option -m stands for the Module name.
alias pip="/usr/bin/python3 -m pip "
Refresh current terminal session
$ . ~/.profile
Solution2 – Setup path variable in Linux or macOS, in case pip3 is installed but still getting pip error
The path variable is set up by default during pip installation, but in case it doesn’t. Follow these steps to set up path variables in Linux or macOS.
- Add this line to ~/.bash_profile using vi or nano editor.
export PATH="export PATH=/usr/bin/:/usr/local/bin:/usr/local/sbin:$PATH"
- In a terminal window, run
source ~/.bash_profile
In the case of macOS, if you are using the zsh shell, then you can add it into the “.zshrc” file. Check out my other article, in case you get the zsh command not found error.
How to fix ‘pip’ is not recognized as an internal or external command, operable program or batch file in Windows 10
If you are getting the “pip command not found error” in Windows 10, follow these steps –
Solution3 – Install Pip during Python3 installation and setup path variable automatically
Step3.1- Python and pip download
You can download the latest python version 3.9.1 for windows or your respective operating system from the python.org website.
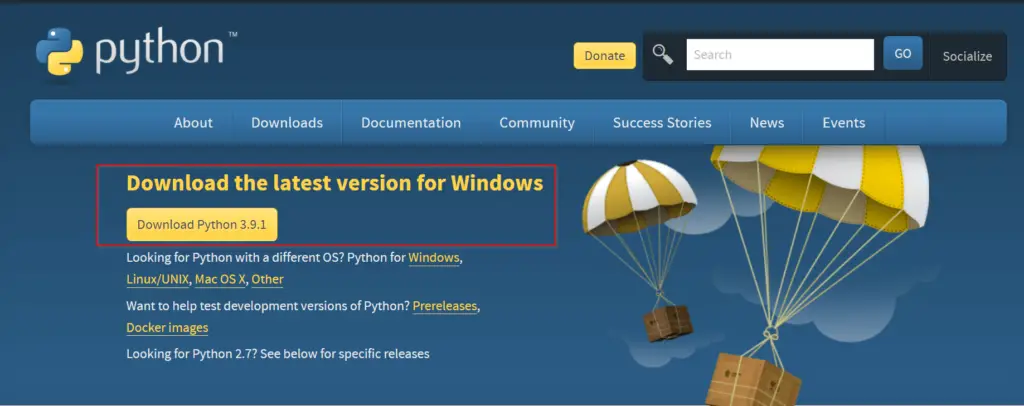
Otherwise, you can simply click on the below-mentioned button to download python for windows 10.
Click here to download an older release of Python like 3.8 or 2.7, for your project. Once you click on this link, scroll down and select your old python version as shown in the image.

You don’t need to download pip separately as it’s part of Python 3.9.1 software. You will know it while following this post further.
Step3.2- Run Python 3.9.1 (64-bit) installer
Once your download completes, visit your “download” directory. Then double click python-3.9.1-amd64 file to start the python setup wizard.

Step3.3- Choose “Install Now” or “Customize” installation
At this point, You will get two installation options –
- Install Now – This option is helpful if you are a newbie. Just select “Install now” and it will install Python 3.9 with default settings. Python default installation directory would be “C:\users\”your-username”\AppData\Programs\Python\Python39”. It will also install IDLE, pip, documentation and shortcuts.
- Customize installation – If you are a pro and need to know, what all features will be installed with python. Also, in case you already have python installed and want to test the latest version. Using the Customize installation option, you can choose a different installation folder and can keep both python versions.
Keep following this post, if you want to see options covered in Customize installation.
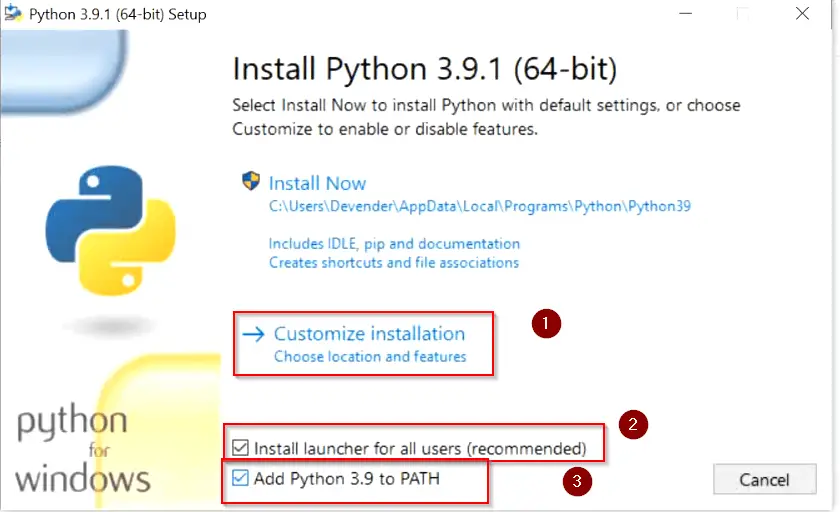
There are two more checkboxes to look into –
- “Install launcher for all users (recommended)” – Select this check box and it will make a python launcher shortcut for all user profiles that exist on your machine. Whomsoever will login to your system will be able to use python 3.9.
- Add python 3.9 to the path – Select this check box to add Python and pip “Path Variables” in the system environment automatically. If you will not select this option now, you need to add the path variable manually later after installation. My recommendation is to select it here itself.
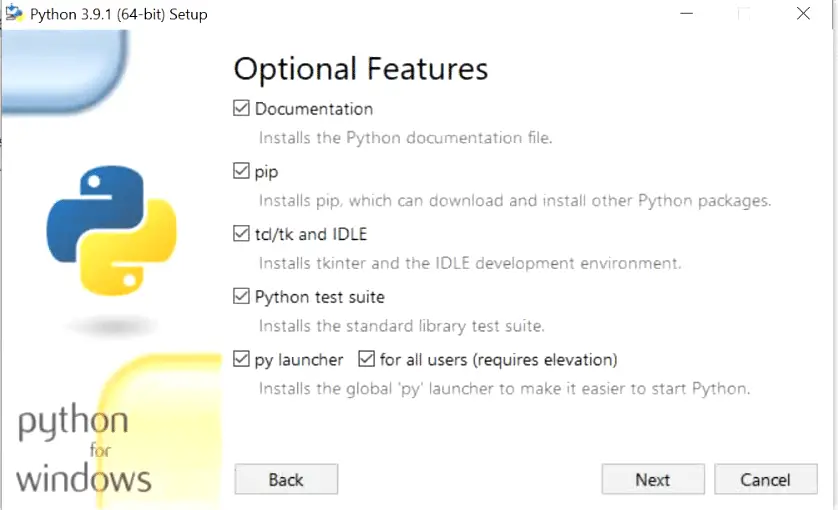
Step3.4- Add or remove “Optional Features“
On this window, you can add or remove optional features, available with python 3.9. Let’s see a few details of each optional feature available –
- Documentation:- Selecting this box will install all the Python documentation and manuals.
- pip:- As I informed you in Step 1 download section. Pip is already part of python 3.9. Select this check box, If you want to install pip automatically with Python 3.9 (which I strongly recommend).
- tcl/tk and IDLE:- Selecting this check box will install Tkinter and the IDLE development environment. You don’t need to install it separately then.
- Python test suite:- Installs the standard library suite.
- py launcher for all users (requires elevation):- Installs the global ‘py launcher for all users. It requires admin rights (elevation) to perform it. Because it will allow all users to launch python easily from their user profiles.
Choose your required optional features and click Next. I will suggest you keep all options checked.
- Select Next and complete the installation with default options.
Step3.5- Validate Python and pip versions
- Open the elevated command prompt “as administrator” by typing “cmd” in the search bar of Windows 10.
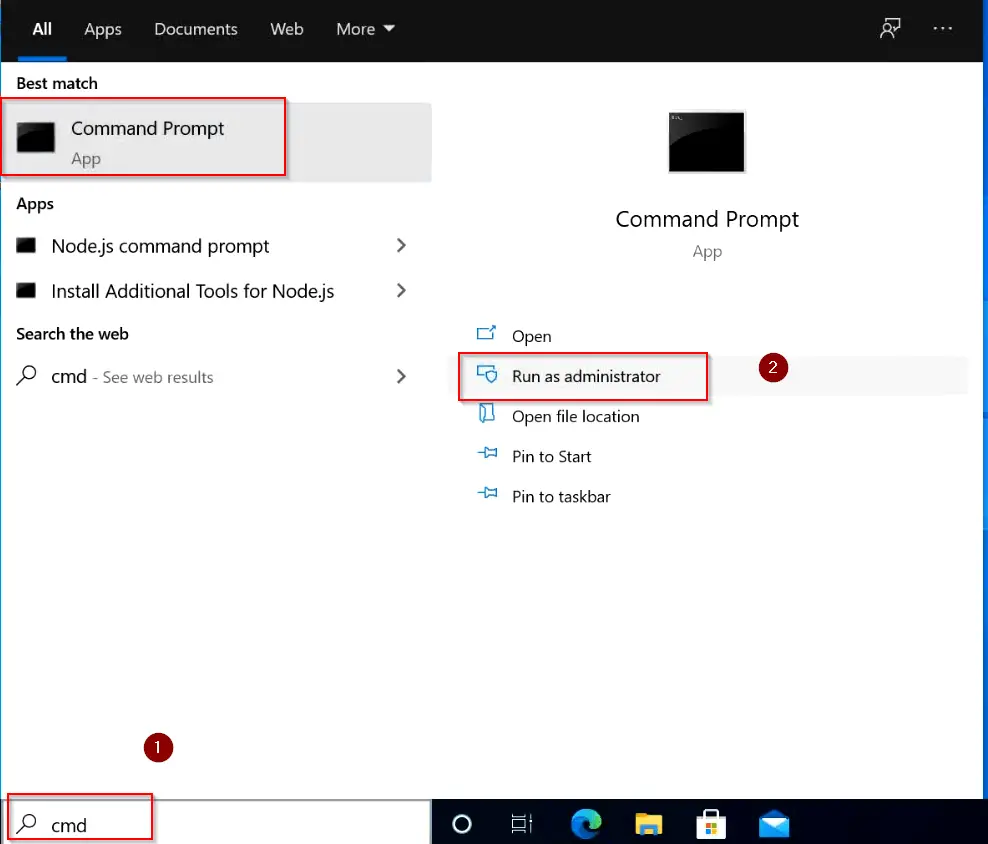
- Run the python or py (short form) command to check the Python version. You can see its version 3.9.1 installed in my case. You will see your installed version.
C:\> py
### OR ###
C:\> python
Type exit() or press “Ctrl + Z” on your keyboard to exit from the python prompt.
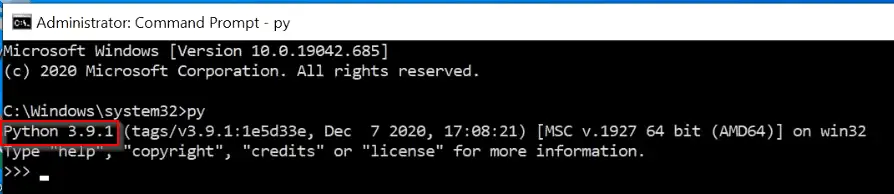
- To check the Python-pip version, type the pip –version command. it will show you the pip version. it’s pip 20.2.3 in my case.
C:\> pip --version

Running the pip and python version command successfully also validates, that your python and pip path variables are added successfully in windows 10.
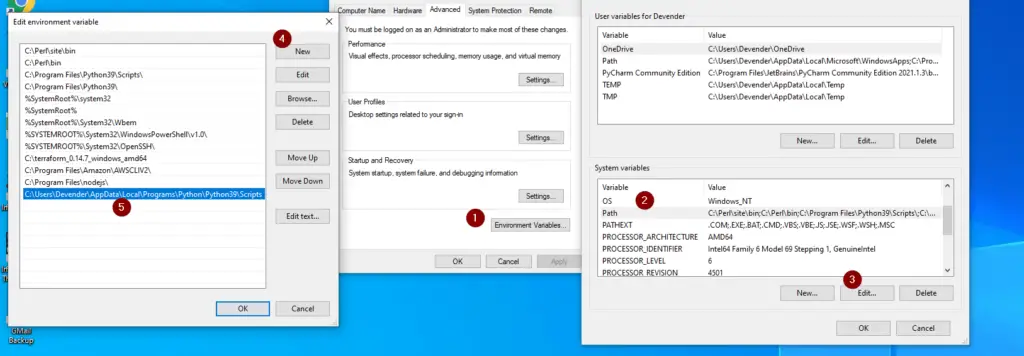
Solution4 – Setup the python Environment variable in Windows 10, in case forgot to select the option during installation
It’s very common to ignore options during the installation of any software in Windows 10. So if you are getting a “pip command not found” error in Windows 10, while you already have Python and pip installed. Then setting the environment up variables can fix this error.
Follow these steps –
- Search for environment variables in Windows 10 search box and select “Edit environment variables”
- Click Open
- Select the “Environment variables” tab
- Click on “PATH” in system variables and choose the “Edit” button.
- Click New
- Add this path, replace “Your_Username” with your user and Python39 with the python version, you have installed.
C:\Users\YOUR_USERNAME\AppData\Local\Programs\Python\Python39\Scripts
In my case, this path would be –
C:\Users\devender\AppData\Local\Programs\Python\Python39\Scripts
- Save and close all open Windows of environment variable
- Open a command prompt and run the pip –version command as shown in step 3.5 above. It will fix your issue of “pip’ is not recognized as an internal or external command, operable program or batch file in Windows 10“.
Refer to this image for further details –
Solution5 – Permission issues, exit root login to fix “pip command not found error”
$ sudo su -l rootThen run the pip command, you will not get the “pip command” errors.
pip <command>
Conclusion
Generally, pip is available with Python in all the latest versions for Windows. For Linux Python is installed by default, you just need to install the pip version.
If you have installed Python correctly, then the pip command not found error is rare. But if you are still having this error, I hope you would be able to fix it by following this article.
Let me know via your comments, in case you still face any issues, I will try to get this solved.